
K1 OH5.0 系统定制说明
修订记录
| 修订版本 | 修订日期 | 修订说明 |
| 001 | 2025-01-13 | 初始版本 |
| 002 | 2025-04-18 | 添加“camera通路定制”章节 |
| 003 | 2025-05-27 | 添加“USB通信定制”章节 |
| 004 | 2025-05-29 | 添加“支持存储外设”章节 |
1. UI 定制
1.1 更换 Boot Logo
Boot Logo 可存放在以下两个位置:
-
通用 Boot Logo: 路径:
device/soc/spacemit/k1/kernel/boot/bootfs该目录下包含同一图案的四个方向版本(0°、90°、180°、270°)。 每个方案根据需要选择不同方向的 Logo, 一般情况下使用 0° 图像。|-- boot_logo_spacemit_0.bmp
|-- boot_logo_spacemit_180.bmp
|-- boot_logo_spacemit_270.bmp
`-- boot_logo_spacemit_90.bmp -
特定方案专用 Boot Logo: 路径:
device/board/spacemit/xxx/kernel/boot/bootfs示例:|-- boot_logo_ry_270.bmp
Boot Logo 需为 32-bit BMP 格式图像。
添加新 Logo 后,在对应方案目录下修改
device/board/spacemit/musepaper/kernel/build_kernel.sh 文件,
在脚本中加入拷贝命令以便在打包时替换:
cp ${OHOS_SOURCE_ROOT}/device/soc/${DEVICE_BOARD}/k1/kernel/boot/bootfs/boot_logo_spacemit_0.bmp ${OHOS_IMAGES_DIR}/bootfs/bianbu.bmp
1.2 更换 Kernel Logo
Kernel Logo 显示在 Boot Logo 与开机动画之间,用于避免启动过程中的黑屏。一般情况下,Kernel Logo 与 Boot Logo 图案保持一致。
**Kernel Logo **放置在 device/board/spacemit/common/kernel_logo,如下:
|-- kernel_logo_ry_270.ppm
|-- kernel_logo_spacemit_0.ppm
|-- kernel_logo_spacemit_180.ppm
|-- kernel_logo_spacemit_270.ppm
`-- kernel_logo_spacemit_90.ppm
Kernel Logo 使用 PPM 格式。
添加新 Logo 后,在对应方案的
device/board/spacemit/xxx/kernel/build_kernel.sh
脚本中添加以下命令,将 logo 文件拷贝至内核编译路径:
cp -rf ${OHOS_SOURCE_ROOT}/device/board/${DEVICE_BOARD}/common/kernel_logo/kernel_logo_spacemit_0.ppm ${KERNEL_BUILD_ROOT}/drivers/video/logo/logo_linux_clut224.ppm
1.2.1 BMP 转 PPM
-
安装转换工具
sudo apt-get install netpbm -
执行脚本,将 BMP 转为 PPM, 转换后会在当前目录生成
xxx.ppm文件。./bmp2ppm.sh xxx.bmp
脚本内容如下:
 #!/bin/bash
 if [ " $1" == " " ];
 then
     echo "usage:$0 bmp_file"
     exit 0
 fi

 if [ -f "$1" ]
 then
     echo $1
 else
     echo "no find file [$1]"
     exit 0
 fi

 name=${1%%.*}
 bmptopnm $1 > $name.pnm
 pnmquant 224 $name.pnm > $name.clut224.pnm
 pnmtoplainpnm $name.clut224.pnm > $name.ppm
 rm $name.pnm $name.clut224.pnm
1.3 更换开机动画
开机动画可以通过两种方式更换:
- 更换原生动画
- 添加定制动画
1.3.1 更换原生动画
原生开��机动画文件位于:
foundation/graphic/graphic_2d/frameworks/bootanimation/data/bootpic.zip
可以直接替换该 zip 包来自定义动画。
zip 包结构如下:
|-- config.json
`-- OH_bootAni compressed
    |-- OH_bootAni_00000.jpg
    |-- OH_bootAni_00001.jpg
    |-- OH_bootAni_00002.jpg
    |-- OH_bootAni_00003.jpg
    |-- ...
    |-- OH_bootAni_00146.jpg
    |-- OH_bootAni_00147.jpg
    |-- OH_bootAni_00148.jpg
    `-- OH_bootAni_00149.jpg
config.json 文件示例:
{
        "Remark": "FrameRate Support 30, 60 frame rate configuration",
        "FrameRate": 30
}
若要自定义动画,请保持与上述文件结构和命名格式一致。
1.3.2 添加定制动画
若要为特定方案添加自定义动画,可在
vendor/spacemit/xxx
目录下新建 bootanimation_custom_config.json 文件,配置如下:
{
        "cust.bootanimation.pics": "/sys_prod/etc/bootanimation/cust_bootpic.zip",
        "cust.bootanimation.sounds": "/sys_prod/etc/bootanimation/cust_bootsound.wav",
        "cust.bootanimation.video": "/sys_prod/etc/bootanimation/cust_bootvideo.mp4"
}
然后将对应的动画资源文件放置在配置路径下(如 /sys_prod/etc/bootanimation/)。
1.4 更换开机音乐
开机音乐可以通过两种方式更换:
- 更换原生音乐
- 添加定制音乐
1.4.1 更换原生音乐
原生开机音乐位于:
foundation/graphic/graphic_2d/frameworks/bootanimation/data/bootsound.wav
可以直接替换该 .wav 文件为自定义音乐。
建议音乐时长不要过长(建议 10s 内)。
1.4.2 添加定制音乐
若要为特定方案添加自定义开机音乐,可在
vendor/spacemit/xxx
目录下新建 bootanimation_custom_config.json 文件,并配置如下:
{
        "cust.bootanimation.pics": "/sys_prod/etc/bootanimation/cust_bootpic.zip",
        "cust.bootanimation.sounds": "/sys_prod/etc/bootanimation/cust_bootsound.wav",
        "cust.bootanimation.video": "/sys_prod/etc/bootanimation/cust_bootvideo.mp4"
}
将自定义的开机音乐文件放置在配置路径下即可。
1.5 更换开机视频
开机视频可通过以下两种方式更换:
- 更换原生开机视频
- 添加定制视频
1.5.1 更换原生视频
将原生路径 foundation/graphic/graphic_2d/frameworks/bootanimation/data/bootvideo.mp4 下的视频替换为新文件。
要求:
- 编码格式为 H.264
- 分辨率比例与屏幕一致
1.5.2 添加定制视频
在 vendor/spacemit 目录下添加��配置文件 bootanimation_custom_config.json,内容示例如下:
{
        "cust.bootanimation.pics": "/sys_prod/etc/bootanimation/cust_bootpic.zip",
        "cust.bootanimation.sounds": "/sys_prod/etc/bootanimation/cust_bootsound.wav",
        "cust.bootanimation.video": "/sys_prod/etc/bootanimation/cust_bootvideo.mp4"
}
并将对应的定制视频放��入上述路径中即可。
1.6 开机视频切换为开机动画
系统默认使用开机视频。如需切换为开机动画,请关闭开机视频播放功能:
在 vendor/spacemit/xxx/config.json 文件中,找到 "component": "graphic_2d",并添加以下配置项:"graphic_2d_feature_player_framework_enable = false"
示例修改如下:
fuqiang@snode2:~/workspace/oh5_r_release/vendor/spacemit/musepaper2$ git diff
diff --git a/musepaper2/config.json b/musepaper2/config.json
index d70ad50..ef16ca6 100755
--- a/musepaper2/config.json
+++ b/musepaper2/config.json
@@ -21,7 +21,8 @@
       "subsystem": "graphic",
       "components": [
         {
           "component": "graphic_2d",
           "features": [
             "graphic_2d_feature_ace_enable_gpu = true",
             "graphic_2d_feature_parallel_render_enable = true",
-            "graphic_2d_feature_rs_enable_eglimage = true"
+            "graphic_2d_feature_rs_enable_eglimage = true",
+            "graphic_2d_feature_player_framework_enable = false"
           ]
         },
         {
1.7 去除对话框
1.7.1 去除 USB 连接时弹出的确认框
相关 hap 的源码位于 base/usb/usb_manager/frameworks/dialog/dialog_ui/usb_right_dialog
- 临时方案:直接删掉对应的 hap 即可
D:\>hdc shell
# mount -o remount,rw /
# cd /system/app/com.usb.right
# rm usb_right_dialog.hap
# cd /
# rm -rf /data/*
# reboot
- 彻底方案:在固件中删掉该 hap, 在
vendor/spacemit/xxx/preinstall-config/install_list.json里删除以下内容:
{
  "app_dir": "/system/app/com.usb.right",
  "removable": true
},
重新编译固件即可
2. 应用定制
2.1 预置应用
2.1.1 添加预置应用
-
将 hap 放置于
applications/standard/hap -
修改
applications/standard/hap/BUILD.gn配置,如下例(以浏览器 hap 为例):diff --git a/BUILD.gn b/BUILD.gn
index c9ea451..87ed7aa 100755
--- a/BUILD.gn
+++ b/BUILD.gn
@@ -407,6 +407,13 @@ ohos_prebuilt_etc("tetris_hap") {
subsystem_name = "applications"
}
+ohos_prebuilt_etc("broswer_hap") {
+ source = "Broswer.hap"
+ module_install_dir = "app/ohos.samples.browser"
+ part_name = "prebuilt_hap"
+ subsystem_name = "applications"
+}
+
group("hap") {
deps = [
":calendarData_hap",
@@ -464,6 +471,7 @@ group("hap") {
"//applications/standard/hap:wuziqi_hap",
"//applications/standard/hap:deviceinfo_hap",
"//applications/standard/hap:tetris_hap",
+ "//applications/standard/hap:broswer_hap",
]
if (defined(product_name) && product_name == "watchos") {
deps -= [ -
修改
vendor/spacemit/xxx/preinstall-config/install_list.json配置进行安装,如下例:diff --git a/musepaper/preinstall-config/install_list.json b/musepaper/preinstall-config/install_list.json
index dd859c2..0107e85 100755
--- a/musepaper/preinstall-config/install_list.json
+++ b/musepaper/preinstall-config/install_list.json
@@ -220,6 +220,10 @@
"app_dir": "/system/app/ohos.samples.game2048",
"removable": false
},
+ {
+ "app_dir": "/system/app/ohos.samples.label",
+ "removable": false
+ },
{
"app_dir": "/system/app/com.example.Digital_Huarong_Road",
"removable": false
2.1.2 删除预置应用
删除应用是添加应用的逆操作,可参考上章节,将 vendor/spacemit/xxx/preinstall-config/install_list.json 中的对应 hap 的配置删除即可。
2.1.3 预置应用可卸载
默认情况下,部分系统预置应用不可卸载。如需允许用户卸载该应用,可在 vendor/spacemit/xxx/preinstall-config/install_list.json 中修改如下:
{
    "app_dir" : "/system/app/com.ohos.note",
    "removable" : true
},
这样即可让该预置应用支持用户手动卸载。
2.2 替换系统应用
系统应用按照 Ability 类型 可分为两类:
- UIAbility:此类系统应用能够展示在桌面,如 Settings、Photos、Camera 等。
- ExtensionAbility:此系统应用有的创建了窗口从而能显示界面,而有的则属于无页面的常驻服务去提供对应的能力, 如 Launcher、SystemUI、Settingsdata 等。
由于这些系统应用通常以系统权限运行,无法通过 hdc install 或 IDE 自动安装,因此需要使用 系统替换方式 进行更新。
示例:��替换 Launcher 应用的替换步骤如下:
-
定位 Launcher 文件路径: 找到 Launcher 预置 hap 路径
/system/app/com.ohos.launcher,目录下包含两个 hap 文件:Launcher.hap和Launcher_Settings.hap -
执行替换命令
hdc shell mount -o remount,rw /
hdc shell rm -rf /data/*
hdc file send Launcher.hap /system/app/com.ohos.launcher/Launcher.hap
hdc file send Launcher_Settings.hap /system/app/com.ohos.launcher/Launcher_Settings.hap
hdc shell reboot -
系统重启后,替换安装新构建的 Launcher 即可生效。
2.3 相册
2.3.1 推送视频
-
准备推送的视频文件
xxx.mp4视频 -
通过 hdc 将视频推入设备:
D:\>hdc file send D:\xxx.mp4 /storage/media/100/local/files/Videos/ -
执行媒体扫描命令:
D:\>hdc shell
# scanner
# -
打开相册应用播放视频。若未显示,请将相册应用后台关闭后重新进入。
2.3.2 推送图片
-
准备要推送的图片文件
xxx.jpg或者xxx.png图片 -
通过 hdc 将图片推到设备:
D:\>hdc file send D:\xxx.jpg /storage/media/100/local/files/Pictures/ -
执行媒体扫描命令:
D:\>hdc shell
# scanner
# -
打开相册应用播放视频。若未显示,请将相册应用后台关闭后重新进入。
2.4 Launcher
2.4.1 替换背景图片
背景图片需准备两张:一张清晰,一张模糊,用于配对显示。如下:

主要修改下面几个位置:
-
修改 systemui,替换下面图片后,重新编译 systemui,将新生成的 hap 放入
applications/standard/hap文件夹applications/standard/systemui/product/phone/dropdownpanel/src/main/resources/phone/media/dropdownpanel_bgc.jpg -
修改 launcher,替换下面图片后,重新编译 launcher,将新生成的 hap 放入
applications/standard/hap文件applications/standard/launcher/product/phone/src/main/ets/common/pics
applications/standard/launcher/feature/appcenter/src/main/ets/default/common/pics/img_wallpaper_form_manager.jpg
applications/standard/launcher/feature/form/src/main/ets/default/common/pics/ic_wallpaper_form_manager.jpg
applications/standard/launcher/feature/recents/src/main/ets/default/common/pics/ic_wallpaper_recent.jpg -
修改系统,替换下面图片后,和上面修改的 hap 一起编译生成新的系统镜像
base/theme/wallpaper_mgr/frameworks/native/data/
2.4.2 替换 Launcher
-
给自定义应用打补丁,伪装成 Launcher
diff --git a/entry/src/main/ets/pages/Index.ets b/entry/src/main/ets/pages/Index.ets
index 8e2d24a..f72e81a 100644
--- a/entry/src/main/ets/pages/Index.ets
+++ b/entry/src/main/ets/pages/Index.ets
@@ -1,3 +1,8 @@
+import hilog from '@ohos.hilog';
+import systemParameterEnhance from '@ohos.systemParameterEnhance';
+
+const DOMAIN = 0x0000;
+
 @Entry
 @Component
 struct Index {
@@ -20,4 +25,26 @@ struct Index {
     .height('100%')
     .width('100%')
   }
+
+  onPageShow(): void {
+    hilog.info(DOMAIN, 'launcher', 'onPageShow');
+    let firstActivate:boolean | undefined = AppStorage.get('firstActivate');
+    if (typeof firstActivate !== 'boolean') {
+      hilog.info(DOMAIN, 'launcher', 'first activate not defined');
+      AppStorage.setOrCreate('firstActivate', true);
+      this.voteBootEvent();
+    } else if (firstActivate) {
+      this.voteBootEvent();
+    }
+  }
+
+  private voteBootEvent(): void {
+    try {
+      AppStorage.setOrCreate('firstActivate', false);
+      systemParameterEnhance.setSync('bootevent.launcher.ready', 'true');
+      hilog.info(DOMAIN, 'launcher', 'set bootevent.launcher.ready -> true');
+    } catch (err) {
+      hilog.error(DOMAIN, 'launcher', 'set voteBootEvent err: %{public}s', JSON.stringify(err));
+    }
+  }
 }
\ No newline at end of file
diff --git a/entry/src/main/module.json5 b/entry/src/main/module.json5
index e691821..0812247 100644
--- a/entry/src/main/module.json5
+++ b/entry/src/main/module.json5
@@ -2,8 +2,9 @@
   "module": {
     "name": "entry",
     "type": "entry",
+    "srcEntry": "./ets/entryability/EntryAbility.ets",
     "description": "$string:module_desc",
-    "mainElement": "EntryAbility",
+    "mainElement": "com.ohos.launcher.MainAbility",
     "deviceTypes": [
       "default"
     ],
@@ -12,7 +13,8 @@
     "pages": "$profile:main_pages",
     "abilities": [
       {
-        "name": "EntryAbility",
+        "priority": 2,
+        "name": "com.ohos.launcher.MainAbility",
         "srcEntry": "./ets/entryability/EntryAbility.ets",
         "description": "$string:EntryAbility_desc",
         "icon": "$media:layered_image",
@@ -23,28 +25,17 @@
         "skills": [
           {
             "entities": [
-              "entity.system.home"
+              "entity.system.home",
+              "flag.home.intent.from.system"
             ],
             "actions": [
-              "action.system.home"
+              "action.system.home",
+              "com.ohos.action.main",
+              "action.form.publish",
             ]
           }
         ]
       }
-    ],
-    "extensionAbilities": [
-      {
-        "name": "EntryBackupAbility",
-        "srcEntry": "./ets/entrybackupability/EntryBackupAbility.ets",
-        "type": "backup",
-        "exported": false,
-        "metadata": [
-          {
-            "name": "ohos.extension.backup",
-            "resource": "$profile:backup_config"
-          }
-        ]
-      }
     ]
   }
 }
\ No newline at end of file -
获取应用 fingerprint 提高 hilog 打印等级并关闭隐私
hilog -b D
hilog -p off
hilog | grep fingerprint > /mnt/1.txt
尝试安装 hap,可在 hilog 中检索到 fingerprint
hdc file send your_launcher.hap /mnt/Launcher.hap
hdc shell bm install -p /mnt/Launcher.hap -
更新
install_list_capability.json将新的 fingerprint 拷贝到install_list_capability.json中 Launcher 对应的位置。 更新到设备/system/etc/app/install_list_capability.jsonhdc file send D:\_Resource\oh\install_list_capability.json /mnt/
hdc shell mount -o rw,remount /
hdc shell cp /mnt/install_list_capability.json /system/etc/app/install_list_capability.json -
删除
launcher_settings.hap删除/system/hap/com.ohos.launcher/launcher_settings.haphdc shell rm /system/hap/com.ohos.launcher/launcher_settings.hap -
安装应用
hdc file send your_launcher.hap /mnt/Launcher.hap
hdc shell mount -o rw,remount /
hdc shell cp /mnt/Launcher.hap /system/app/com.ohos.launcher/Launcher.hap
hdc shell rm -rf /data/* -
reboot
hdc shell reboot
2.5 锁屏
2.5.1 去掉锁屏
-
在
applications/standard/hap/BUILD.gn文件中去除锁屏应用相关�的代码,如下:diff --git a/BUILD.gn b/BUILD.gn
index e213683..7382b97 100755
--- a/BUILD.gn
+++ b/BUILD.gn
@@ -463,7 +463,6 @@ group("hap") {
"//applications/standard/hap:note_hap",
"//applications/standard/hap:notificationManagement_hap",
"//applications/standard/hap:photos_hap",
- "//applications/standard/hap:screenLock_hap",
"//applications/standard/hap:screen_shot_hap",
"//applications/standard/hap:settingsData_hap",
"//applications/standard/hap:settings_faceauth_hap",
@@ -518,7 +517,6 @@ group("hap") {
"//applications/standard/hap:navigationBar_hap",
"//applications/standard/hap:notificationManagement_hap",
"//applications/standard/hap:photos_hap",
- "//applications/standard/hap:screenLock_hap",
"//applications/standard/hap:screen_shot_hap",
"//applications/standard/hap:settingsData_hap",
"//applications/standard/hap:settings_faceauth_hap", -
在
foundation/systemabilitymgr/safwk/etc/profile/foundation.cfg文件中去除开机时对锁屏应用状态的检测,如下:diff --git a/etc/profile/foundation.cfg b/etc/profile/foundation.cfg
index f2573fa..1a21510 100644
--- a/etc/profile/foundation.cfg
+++ b/etc/profile/foundation.cfg
@@ -25,7 +25,6 @@
"name" : "services:restartfoundation",
"cmds" : [
"unset_bootevent bootevent.appfwk.ready",
- "unset_bootevent bootevent.lockscreen.ready",
"unset_bootevent bootevent.launcher.ready",
"reset appspawn",
"reset accountmgr",
@@ -141,7 +140,6 @@
"bootevents": [
"bootevent.wms.fullscreen.ready",
"bootevent.appfwk.ready",
- "bootevent.lockscreen.ready",
"bootevent.launcher.ready",
"bootevent.wms.ready"
], -
去除窗口控制器对锁屏信号的响应;因为这里我们只是去掉了锁屏应用,但触发锁屏的机制还在,比如说按键触发和遥控器触发,只是没有实际的响应,如果不去掉,当再触发进入锁屏的机制,可能会出现应用界面冻结。 修改
foundation/window/window_manager/wmserver/src/window_controller.cpp文件,如下:diff --git a/wmserver/src/window_controller.cpp b/wmserver/src/window_controller.cpp
index 32c6a60ec..98df12ffc 100644
--- a/wmserver/src/window_controller.cpp
+++ b/wmserver/src/window_controller.cpp
@@ -783,8 +783,8 @@ void WindowController::NotifyDisplayStateChange(DisplayId defaultDisplayId, sptr
WLOGFD("NotifyDisplayStateChange start: %{public}u", type);
switch (type) {
case DisplayStateChangeType::BEFORE_SUSPEND: {
- isScreenLocked_ = true;
- windowRoot_->ProcessWindowStateChange(WindowState::STATE_FROZEN, WindowStateChangeReason::KEYGUARD);
+ //isScreenLocked_ = true;
+ //windowRoot_->ProcessWindowStateChange(WindowState::STATE_FROZEN, WindowStateChangeReason::KEYGUARD);
break;
}
case DisplayStateChangeType::BEFORE_UNLOCK: {
副作用:无下拉菜单
2.6. USB 通信定制
2.6.1. 使用 USB DDK 通信
-
使用 Deveco Studio 创建 Native C++ 工程 在
entry/build-profile.json5添加 riscv64 适配, 如下:{
"apiType": "stageMode",
"buildOption": {
"externalNativeOptions": {
"path": "./src/main/cpp/CMakeLists.txt",
"arguments": "",
"abiFilters": [
"riscv64"
],
"cppFlags": "",
}
},
"buildOptionSet": [
{
"name": "release",
"arkOptions": {
"obfuscation": {
"ruleOptions": {
"enable": false,
"files": [
"./obfuscation-rules.txt"
]
}
}
},
"nativeLib": {
"debugSymbol": {
"strip": true,
"exclude": []
}
}
},
],
"targets": [
{
"name": "default"
},
{
"name": "ohosTest",
}
]
} -
在
entry/src/main/module.json5申请权限:...
"requestPermissions": [
{
"name": "ohos.permission.ACCESS_DDK_USB"
}
]
... -
链接动态库 修改
entry/src/main/cpp/CMakeLists.txt添加相关 lib:target_link_libraries(entry PUBLIC libace_napi.z.so libhilog_ndk.z.so libusb_ndk.z.so) -
entry/src/main/cpp/napi_init.cpp中添加 USB 读写逻辑:#include "napi/native_api.h"
#include <usb/usb_ddk_api.h>
#include <usb/usb_ddk_types.h>
#include <hilog/log.h>
uint64_t interfaceHandle = 0;
struct UsbDeviceMemMap *devMmap = nullptr;
static napi_value UsbInit(napi_env env, napi_callback_info info)
{
napi_value result;
// 初始化USB DDK
OH_Usb_Init();
struct UsbDeviceDescriptor devDesc;
uint64_t deviceId = 0x0000000200000002; //对应耳机usb节点:/dev/bus/usb/001/003 001对应高八位 004对应第八位
// 获取设备描述符
OH_Usb_GetDeviceDescriptor(deviceId, &devDesc);
struct UsbDdkConfigDescriptor *config = nullptr;
// 获取配置描述符
OH_Usb_GetConfigDescriptor(deviceId, 1, &config);
// 根据配置描述符,找到所需要通信的interfaceIndex
uint8_t interfaceIndex = 0;
// 声明接口
int ret = OH_Usb_ClaimInterface(deviceId, interfaceIndex, &interfaceHandle);
// 释放配置描述符
OH_Usb_FreeConfigDescriptor(config);
napi_create_int32(env, ret, &result);
return result;
}
static napi_value UsbSend(napi_env env, napi_callback_info info)
{
napi_value result;
// 超时时间,设置为1s;
uint32_t timeout = 1000;
//获取deviceid、devicekey
struct UsbControlRequestSetup setupWrite1;
setupWrite1.bmRequestType = 0x40;
setupWrite1.bRequest = 0x09;
setupWrite1.wValue = 0x200;
setupWrite1.wIndex = 0x4;
setupWrite1.wLength = 0x10;
uint8_t dataWrite1[10] = {0xA5,0x5A,0xFA,0x02,0x02,0x00,0x16};
uint32_t dataWriteLen1 = 10;
// 发送控制写请求
OH_Usb_SendControlWriteRequest(interfaceHandle, &setupWrite1, timeout, dataWrite1, dataWriteLen1);
struct UsbControlRequestSetup setupRead;
setupRead.bmRequestType = 0xC0;
setupRead.bRequest = 0x01;
setupRead.wValue = 0x101;
setupRead.wIndex = 0x4;
setupRead.wLength = 0x100;
uint8_t dataRead[256] = {};
uint32_t dataReadLen = 256;
// 发送控制读请求
int ret = OH_Usb_SendControlReadRequest(interfaceHandle, &setupRead, timeout, dataRead, &dataReadLen);
for(int i = 0; i < 10; i++){
OH_LOG_Print(_LOG_APP_, _LOG_ERROR_, 0xff, "usb-ddk", "data read:%{public}x", dataRead[i]);
}
napi_create_int32(env, ret, &result);
return result;
}
static napi_value UsbDestroy(napi_env env, napi_callback_info info)
{
napi_value result;
// 销毁缓冲区
// 释放接口
int ret = OH_Usb_ReleaseInterface(interfaceHandle);
// 释放USB DDK
OH_Usb_Release();
napi_create_int32(env, ret, &result);
return result;
}
EXTERN_C_START
static napi_value Init(napi_env env, napi_value exports)
{
napi_property_descriptor desc[] = {
{ "usbInit", nullptr, UsbInit, nullptr, nullptr, nullptr, _napi_default_, nullptr },
{ "usbDestroy", nullptr, UsbDestroy, nullptr, nullptr, nullptr, _napi_default_, nullptr },
{ "usbSend", nullptr, UsbSend, nullptr, nullptr, nullptr, _napi_default_, nullptr }
};
napi_define_properties(env, exports, sizeof(desc) / sizeof(desc[0]), desc);
return exports;
}
EXTERN_C_END
static napi_module demoModule = {
.nm_version = 1,
.nm_flags = 0,
.nm_filename = nullptr,
.nm_register_func = Init,
.nm_modname = "entry",
.nm_priv = ((void*)0),
.reserved = { 0 },
};
extern "C" __attribute__((constructor)) void RegisterEntryModule(void)
{
napi_module_register(&demoModule);
}entry/src/main/cpp/types/libentry/Index.d.ts中添加声明:**export const **usbInit: () => number;
**export **const usbDestroy: () => number;
export const usbSend: () => number; -
UI 中调用:
**import **testNapi **from **'libentry.so';
@Entry
@Component
**struct **Index {
@State message: string = 'Control Red Led';
build() {
Row() {
Column() {
Text(**this**.message)
.fontSize(50)
.fontWeight(FontWeight.Bold)
.onClick(() => {
testNapi.usbInit(); //传入资源对象,以及访问的rawfile文��件夹名称
testNapi.usbSend();
testNapi.usbDestroy();
})
}
.width('100%')
}
.height('100%')
}
}
2.6.2. 使用 HID DDK 通信
注意:由于 OH5.0 版本 hid ddk 的功能实现尚未完全,可通过直接读写 hidraw 节点实现通信。
-
内核打开 hidraw 配置(
kernel\linux\spacemit_kernel-6.6\arch\riscv\configs\k1_defconfig)CONFIG_HIDRAW=y修改 hidraw 节点读写权限(
base\startup\init\ueventd\etc\ueventd.config)/dev/bus/usb/* 0666 0 0 -
使用 Deveco Studio 创建 Native C++ 工程 在
entry/build-profile.json5添加 riscv64 适配{
"apiType": "stageMode",
"buildOption": {
"externalNativeOptions": {
"path": "./src/main/cpp/CMakeLists.txt",
"arguments": "",
"abiFilters": [
"riscv64"
],
"cppFlags": "",
}
},
"buildOptionSet": [
{
"name": "release",
"arkOptions": {
"obfuscation": {
"ruleOptions": {
"enable": false,
"files": [
"./obfuscation-rules.txt"
]
}
}
},
"nativeLib": {
"debugSymbol": {
"strip": true,
"exclude": []
}
}
},
],
"targets": [
{
"name": "default"
},
{
"name": "ohosTest",
}
]
} -
链接动态库 修改
entry/src/main/cpp/CMakeLists.txt添加相关 lib:target_link_libraries(entry PUBLIC libace_napi.z.so libhilog_ndk.z.so) -
entry/src/main/cpp/napi_init.cpp中添加 HID 节点读写逻辑,写数据示例如下:#include "napi/native_api.h"
#include <hilog/log.h>
#include <iostream>
#include <fcntl.h>
#include <unistd.h>
#include <cstdint>
#include <cerrno>
static napi_value HidTest(napi_env env, napi_callback_info info)
{
napi_value result;
const uint8_t hid_data[] = {
0x2E, 0xAA, 0xEC, 0x6B, 0x00, 0x07, 0xA2, 0xA4,
0x43, 0xA5, 0xA5, 0xC1, 0x5A, 0xF6, 0x00, 0x00,
0x00, 0x00, 0x00, 0x00, 0x00, 0x00, 0x00, 0x00,
0x00, 0x00, 0x00, 0x00, 0x00, 0x00, 0x00, 0x00,
0x00, 0x00, 0x00, 0x00, 0x00, 0x00, 0x00, 0x00,
0x00, 0x00, 0x00, 0x00, 0x00, 0x00, 0x00, 0x00,
0x00, 0x00, 0x00, 0x00, 0x00, 0x00, 0x00, 0x00,
0x00, 0x00, 0x00, 0x00, 0x00, 0x00, 0x00, 0x00
};
const size_t data_len = sizeof(hid_data);
int fd = open("/dev/hidraw1", O_WRONLY);
if (fd == -1) {
OH_LOG_Print(_LOG_APP_, _LOG_ERROR_, 0xff, "hid-ddk", "open hidraw error");
}
ssize_t write_result = write(fd, hid_data, data_len);
if (write_result == -1) {
OH_LOG_Print(_LOG_APP_, _LOG_ERROR_, 0xff, "hid-ddk", "write error:%{public}s",std::strerror(errno));
}
if (write_result != static_cast<ssize_t>(data_len)) {
OH_LOG_Print(_LOG_APP_, _LOG_ERROR_, 0xff, "hid-ddk", "only write:%{public}zu",data_len);
} else {
OH_LOG_Print(_LOG_APP_, _LOG_ERROR_, 0xff, "hid-ddk", "write success:%{public}zu",write_result);
}
close(fd);
fd = -1;
napi_create_uint32(env, write_result, &result);
return result;
}
EXTERN_C_START
static napi_value Init(napi_env env, napi_value exports)
{
napi_property_descriptor desc[] = {
{ "hidTest", nullptr, HidTest, nullptr, nullptr, nullptr, _napi_default_, nullptr },
};
napi_define_properties(env, exports, sizeof(desc) / sizeof(desc[0]), desc);
return exports;
}
EXTERN_C_END
static napi_module demoModule = {
.nm_version = 1,
.nm_flags = 0,
.nm_filename = nullptr,
.nm_register_func = Init,
.nm_modname = "entry",
.nm_priv = ((void*)0),
.reserved = { 0 },
};
extern "C" __attribute__((constructor)) void RegisterEntryModule(void)
{
napi_module_register(&demoModule);
} -
entry/src/main/cpp/types/libentry/Index.d.ts中添加声明:**export const hidTest: () => number;** -
UI 中调用:
**import **testNapi **from **'libentry.so';

@Entry
@Component
**struct **Index {
  @State message: string = 'Control Red Led';
  build() {
    Row() {
      Column() {
        Text(**this**.message)
          .fontSize(50)
          .fontWeight(FontWeight.Bold)
          .onClick(() => {
            testNapi.hidTest();
          })
      }
      .width('100%')
    }
    .height('100%')
  }
}
2.7 应用自启动
目前支持在锁屏应用中拉起目标应用来实现自启动。需要在 vendor/spacemit/xxx/etc/param/product_xxx.para 中添加并配置如下属性:
const.product.appboot.enabled=1                     # 1:开启应用自启动 0:关闭应用自启动
const.product.appboot.bundlename="org.ohosdev.foh"  # 应用包名
const.product.appboot.modulename="entry"            # 模块名
const.product.appboot.abilityname="EntryAbility"    # Ability名称
添加上述属性后,重新编译生成镜像文件(img),并烧录到设备上,即可生效。
注意:需要确保自启动的目标应用存在于系统中。
3. 系统定制
3.1 添加系统属性
3.1.1 固定值系统属性
可通过在以下路径添加属性来定义或覆盖系统属性:
vendor/spacemit/xxx/etc/param/product_xxx.para
示例如下:
const.product.name="MUSEPAPER"
const.product.manufacturer="SPACEMIT"
const.product.brand="MUSEPAPER"
const.software.model="1.0.0.1"
const.product.hardwareversion="1.0.0.0"
const.product.software.version="1.0.0.1"
const.product.incremental.version="1.0.0.0"
const.build.product="MUSEPAPER"
添加的属性可以是已经存在的系统属性,这里进行覆盖,也可以是新添加的自定义名称的属性。
3.1.2 读取值系统属性
与固定值属性不同,读取值系统属性是在系统启动时,通过读取系统节点等方式动态生成并写入到系统属性中的。
这类属性的逻辑需要在以下文件中实现:
base/startup/init/services/init/standard/init.c
代码已经添加了获取 CPU 型号和 MEM 大小的例子,以下以获取内存大小为例说明:
-
添加通过节点读取信息的接口
void get_memory_size(char *buffer) {
    FILE *fp = fopen("/proc/meminfo", "r");
    if (!fp) {
        perror("Could not open /proc/meminfo");
        return;
    }

    char line[BUFFER_SIZE];
    while (fgets(line, sizeof(line), fp)) {
        if (strstr(line, "MemTotal")) {
            char *colon = strchr(line, ':');
            if (colon) {
                unsigned long mem_kb;
                sscanf(colon + 1, "%lu", &mem_kb);
                float mem_gb = mem_kb / (1024.0 * 1024.0);
                snprintf(buffer, BUFFER_SIZE, "%d GB", closest_value(mem_gb));
                break;
            }
        }
    }
    fclose(fp);
} -
在
RegisteSystemParameter中调用接口并写入属性void RegisteSystemParameter(void){
...
char memory_size[BUFFER_SIZE] = "Unknown";
...
get_memory_size(memory_size);
...
i = SystemWriteParameter("const.product.mem", memory_size);
INIT_LOGI("const.product.mem = %s, ret = %d", memory_size, i);
}
3.2 电源管理定制
主要修改文件:vendor/spacemit/xxx/power_config/power_mode_config.xml,示例如下:
<!--
    Power Mode Definitions:
    MODE_NORMAL = 600,
    MODE_POWER_SAVE = 601,
    MODE_PERFORMANCE = 602,
    MODE_EXTREME_POWER_SAVE = 603,
-->
<!--
    Action Definitions:
    DisplayOffTime = 101,
    SystemAutoSleepTime = 102,
    AutoAdjustBrightness = 103,
    AutoWindowRotation = 107,
    SystemBrightness = 115,
    VibratorsState = 120,
-->
<switch_proxy version="1">
    <proxy id="600">
        <switch id="101" value="300000" recover_flag="0"/>
        <switch id="102" value="0" recover_flag="0"/>
        <switch id="103" value="-1" recover_flag="0"/>
        <switch id="107" value="1" recover_flag="0"/>
        <switch id="115" value="76" recover_flag="0"/>
        <switch id="120" value="1" recover_flag="0"/>
    </proxy>
    <proxy id="601">
        <switch id="101" value="10000" recover_flag="0"/>
        <switch id="102" value="5000" recover_flag="0"/>
        <switch id="103" value="-1" recover_flag="0"/>
        <switch id="107" value="-1" recover_flag="0"/>
        <switch id="115" value="50" recover_flag="0"/>
        <switch id="120" value="-1" recover_flag="0"/>
    </proxy>
    <proxy id="602">
        <switch id="101" value="-1" recover_flag="0"/>
        <switch id="102" value="-1" recover_flag="0"/>
        <switch id="103" value="-1" recover_flag="0"/>
        <switch id="107" value="1" recover_flag="0"/>
        <switch id="115" value="255" recover_flag="0"/>
        <switch id="120" value="1" recover_flag="0"/>
    </proxy>
    <proxy id="603">
        <switch id="101" value="5000" recover_flag="0"/>
        <switch id="102" value="1000" recover_flag="0"/>
        <switch id="103" value="-1" recover_flag="0"/>
        <switch id="107" value="-1" recover_flag="0"/>
        <switch id="115" value="25" recover_flag="0"/>
        <switch id="120" value="-1" recover_flag="0"/>
    </proxy>
</switch_proxy>
该文件定义了多种电源模式管理模式(正常、省电、性能、超级省电)及对应参数(关屏时间、休眠时间等)。
3.2.1 设置不关屏休眠
系统默认使用 MODE_NORMAL 模式,可通过命令切换到其他模式, 如需防止休眠,可切换为性能模式:
power-shell setmode 602
3.2.2 设置关屏时间
通过 DisplayOffTime (101) 控制关屏时长,单位为毫秒(ms),示例如下:
<switch id="101" value="300000" recover_flag="0"/>
//300000 表示开机后,3分钟后关屏

<switch id="101" value="-1" recover_flag="0"/>
//-1 表示永不关屏
3.2.3 设置深度休眠时间
通过 SystemAutoSleepTime (102) 控制深度休眠时长,单位为毫秒(ms),示例如下:
<switch id="102" value="0" recover_flag="0"/>
//0 表示关屏后马上休眠

<switch id="102" value="5000" recover_flag="0"/>
//5000 表示关屏5s后,进入休眠

<switch id="102" value="-1" recover_flag="0"/>
//-1 表示只关屏,不休眠
3.3 窗口管理定制
主要修改路径:vendor/spacemit/xxx/window_config/,包括以下两个文件:
display_manager_config.xmlwindow_manager_config.xml
3.3.1 display_manager_config.xml
 <Configs>
    <!--Window display dpi, valid range is 80~640, use 0 if no configuration is requeired-->
    <dpi>240</dpi>
    <!-- Indicate the deviation between the default device display direction and the direction -->
    <!-- of the sensor. Use 0 in default, available values are {0, 90, 180, 270} -->
    <defaultDeviceRotationOffset>0</defaultDeviceRotationOffset>
    <!-- Svg path for cutout, use empty string if there is not cutout on the screen -->
    <!-- format: string -->
    <!-- default value: empty string -->
    <!-- sample: M 100,100 m -75,0 a 75,75 0 1,0 150,0 a 75,75 0 1,0 -150,0 z -->
    <defaultDisplayCutoutPath></defaultDisplayCutoutPath>
    <!-- Indicates the boundary of the curved screen, each value corresponds to the px from each edge -->
    <!-- format: number(left) number(top) number(right) number(bottom) -->
    <!-- default value: 0 0 0 0 -->
    <!-- sample: 150 150 0 0 -->
    <curvedScreenBoundary>0 0 0 0</curvedScreenBoundary>
    <!-- Indicates whether the built-in display is a waterfall display -->
    <!-- format: boolean -->
    <!-- default value: false -->
    <!-- sample: false -->
    <isWaterfallDisplay enable="false"></isWaterfallDisplay>

    <!-- Indicate whether to enable display area compression for waterfall display when displayed in landscape -->
    <!-- or landscape_inverted mode. -->
    <!-- This configuration item takes effect only when isWaterfallDisplay above is true -->
    <!-- format: boolean -->
    <!-- default value: false -->
    <isWaterfallAreaCompressionEnableWhenHorizontal enable="false"></isWaterfallAreaCompressionEnableWhenHorizontal>

    <!-- Indicate the size of both sides of the waterfall display which to be compressed when displayed in landscape -->
    <!-- or landscape_inverted mode. -->
    <!-- This configuration item takes effect only when isWaterfallDisplay above is true -->
    <!-- format: uint32_t, the unit is vp. -->
    <!-- default value: 0 -->
    <waterfallAreaCompressionSizeWhenHorzontal>0</waterfallAreaCompressionSizeWhenHorzontal>

    <!-- Indicates orientation of the built-in screen -->
    <!-- 0: Orientation::UNSPECIFIED -->
    <!-- 1: Orientation::VERTICAL         2: Orientation::HORIZONTAL-->
    <!-- 3: Orientation::REVERSE_VERTICAL 4: Orientation::REVERSE_HORIZONTAL -->
    <buildInDefaultOrientation>0</buildInDefaultOrientation>
 </Configs>
主要修改的配置为:
- dpi:像素密度,值越大图标越小。
- buildInDefaultOrientation:桌面旋转角度配置。
3.3.2 window_manager_config.xml
主要用于配置窗口动画,效果等,一般仅需少量调整。
3.4 网络管理定制
3.4.1 Wi-Fi 定制
3.4.1.1 驱动调试
该调试功能主要由进迭时空进行,确保驱动功能正常并可成功编译生成 .ko 文件。
3.4.1.2 拷贝 ko 文件(以 rtl8852bs 为例)
在 device/board/spacemit/xxx/kernel 的 build_kernel.sh 中进行拷贝,如下:
function cp_ko(){
  # cp ko to userspace
  cp ${KERNEL_BUILD_ROOT}/drivers/usb/typec/typec.ko ${OHOS_SOURCE_ROOT}/device/board/${DEVICE_BOARD}/${DEVICE_NAME}/kernel/ko
  cp ${KERNEL_BUILD_ROOT}/drivers/usb/typec/husb239.ko ${OHOS_SOURCE_ROOT}/device/board/${DEVICE_BOARD}/${DEVICE_NAME}/kernel/ko
  cp ${KERNEL_BUILD_ROOT}/drivers/net/wireless/realtek/rtl8852be/8852be.ko ${OHOS_SOURCE_ROOT}/device/board/${DEVICE_BOARD}/${DEVICE_NAME}/kernel/ko
  cp ${KERNEL_BUILD_ROOT}/drivers/net/wireless/realtek/rtl8852bs/8852bs.ko ${OHOS_SOURCE_ROOT}/device/board/${DEVICE_BOARD}/${DEVICE_NAME}/kernel/ko
}
内核编译完成后��,将内核编译目录下的 .ko 文件拷贝到 OpenHarmony 系统的目录下,在编译 OpenHarmony 时,这些 .ko 文件 被自动打包至 vendor 分区。
3.4.1.3 加载 ko 文件(以 8852bs 为例)
在 device/board/spacemit/xxx/cfg 的 init.xxx.cfg 中进行 .ko 文件 的加载,如下:
{
  "name" : "fs",
    "cmds" : [
      "insmod /vendor/modules/8852bs.ko ifname=wlan0 if2name=p2p0",
      "insmod /vendor/modules/typec.ko",
      "insmod /vendor/modules/husb239.ko"
    ]
},
系统启动后,init 进程会自动加载 .ko 文件,加载这些 ko,可通过 lsmod 命令验证否加载成功,如下:
# lsmod
Module                  Size  Used by
husb239               110592  0
typec                 323584  1 husb239
8852bs              10031104  0
3.4.2 BT 定制
待添加
3.4.3 4G 定制
待添加
3.5 多媒体系统定制
3.5.1 音频通路定制
在 vendor\spacemit\xxx\hals\audio\alsa_adapter.json 中添加声卡信息。
{
    "adapters": [
        {
            "name": "primary",
            "cardId": 0,
            "cardName": "sndes8326"
        },
        {
            "name": "usb",
            "cardId": 1,
            "cardName": "C"
        }
    ]
}
在 vendor\spacemit\xxx\hals\audio\config\riscv64\audio_policy_config.xml 中配置不同声卡的音频属性,包括播放、录制下的采样率、通道数、buffer 大小等。
        <adapter name="primary" supportSelectScene="0">
            <pipes>
                <pipe name="primary_output" role="output">
                    <paProp lib="libmodule-hdi-sink.z.so" role="sink" fixed_latency="1" render_in_idle_state="1" moduleName="Speaker"/>
                    <streamProps>
                        <streamProp format="s16le" sampleRates="48000" channelLayout="CH_LAYOUT_STEREO" bufferSize="4096"/>
                    </streamProps>
                    <attributes>
                        <attribute name="preload" value="true"/>
                    </attributes>
                </pipe>
                <pipe name="primary_input" role="input">
                    <paProp lib="libmodule-hdi-source.z.so" role="source" moduleName="Built_in_mic"/>
                    <streamProps>
                        <streamProp format="s16le" sampleRates="48000" channelLayout="CH_LAYOUT_STEREO" bufferSize="4096"/>
                    </streamProps>
                </pipe>
            </pipes>
            <devices>
                <device name="Speaker_Out" type="DEVICE_TYPE_SPEAKER" pin="PIN_OUT_SPEAKER" role="output" supportPipes="primary_output"/>
                <device name="Wired_Headset_Out" type="DEVICE_TYPE_WIRED_HEADSET" pin="PIN_OUT_HEADSET" role="output" supportPipes="primary_output"/>
                <device name="Wired_Headphones_Out" type="DEVICE_TYPE_WIRED_HEADPHONES" pin="PIN_OUT_HEADPHONE" role="output" supportPipes="primary_output"/>
                <device name="Builtin_Mic_In" type="DEVICE_TYPE_MIC" pin="PIN_IN_MIC" role="input" supportPipes="primary_input"/>
                <device name="Wired_Headset_In" type="DEVICE_TYPE_WIRED_HEADSET" pin="PIN_IN_HS_MIC" role="input" supportPipes="primary_input"/>
            </devices>
        </adapter>
                <adapter name="usb">
            <pipes>
                <pipe name="usb_output" role="output">
                    <paProp lib="libmodule-hdi-sink.z.so" role="sink" fixed_latency="1" render_in_idle_state="1" moduleName="Usb_arm_speaker"/>
                    <streamProps>
                        <streamProp format="s16le" sampleRates="48000" channelLayout="CH_LAYOUT_STEREO" bufferSize="4096"/>
                    </streamProps>
                    <attributes>
                        <attribute name="preload" value="true"/>
                    </attributes>
                </pipe>
                <pipe name="usb_input" role="input">
                    <paProp lib="libmodule-hdi-source.z.so" role="source" moduleName="Usb_arm_mic"/>
                    <streamProps>
                        <streamProp format="s16le" sampleRates="48000" channelLayout="CH_LAYOUT_STEREO" bufferSize="19200"/>
                    </streamProps>
                </pipe>
            </pipes>
            <devices>
                <device name="Usb_Headset_Out" type="DEVICE_TYPE_USB_HEADSET" pin="PIN_OUT_USB_HEADSET" role="output" supportPipes="usb_output"/>
                <device name="Usb_Headset_In" type="DEVICE_TYPE_USB_HEADSET" pin="PIN_IN_USB_HEADSET" role="input" supportPipes="usb_input"/>
            </devices>
        </adapter>
3.5.2 Camera 通路定制(MIPI)
完成 Camera 通路的适配,包括以下三个步骤:
- 确保 Camera 底层驱动正常,保证
cam-test的 demo 正常出图 - 确保 svivi 虚拟摄像头驱动正常,保证
v4l2_test_spacemit正常出图 - 将 Camera 适配到 OH 框架
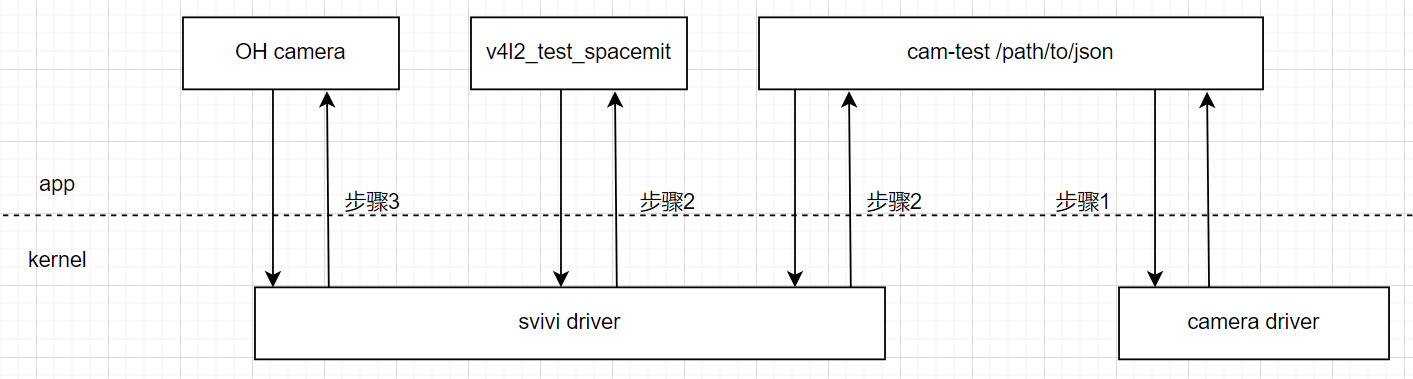
下面分 3 个小结进行详细说明:
3.5.2.1 确保** C****amera** 底层驱动正常
- cam-test****应用点亮一款 OH 已支持的摄像头,只需两步
第一步:
首先确认摄像头连接开发板的 MIPI CSI 接口,例如连接至 CSI1,则运行以下命令探测摄像头:
cam-test /system/profile/csi1_camera_detect.json
(若为 MIPI CSI2 接口,则替换为对应的配置文件 csi2_camera_detect.json。)
运行结果如下:
......
I: ./sensors/cam_sensors_module.c(235): "detect ov16a10_spm sensors in csi1: success, set 3840x2160 to 1920x1080"
I: auto_detect_camera(1401): "auto detect sensor ===================== finish "
I: update_json_file(672): "save json to /data/csi1_camera_auto.json success"
说明:
cam-test 会自动探测连接在 MIPI CSI1 接口上的已支持摄像头的 ID。若检测成功,系统将在 /data/ 目录生成对应的 JSON 配置文件,该文件将在后续步骤中使用。若未检测到摄像头,则可能原因包括:该摄像头尚未被支持、硬件连接存在问题,或软件配置不正确。遇到此情况,建议联系进迭时空工程师寻求支�持。
从上述运行 log 可知,ov16a10 sensor 生成的 JSON 文件默认使用模式 0,其中 sensor 输出分辨率为 3840×2160,ISP 输出分辨率为 1920×1080。有关 JSON 配置文件的详细参数说明,请参阅《camera 快速启动指南》的相关章节。
第二步:
运行以下命令,使用自动生成的 JSON 配置文件启动摄像头,采集 500 帧图像,并保存第 250 帧:
cam-test /data/csi1_camera_auto.json
若在终端中观察到如下打印,说明摄像头已成功开流并输出数据。
I: cpp_client_receive_mctf_buffers(1833): "CPP0: frameid 1, fps 30.0"
若运行失败,请联系进迭时空工程师提供支持,并准备以下资料以便排查问题:cam-test 测试日志文件,dmesg 内核打印文件, 测试情况说明
-
cam-test 应用点亮一款 OH 未支持的新摄像头 若摄像头未被 OH 系统支持,请参考《camera 快速启动指南》中“快速点亮导览”的情况二。与指南不同的是,此时
cam-test源码路径需更改为:device/soc/spacemit/k1/hardware/camera其余操作与标准流程基本相同,此处不再赘述。
3.5.2.2 确保 svivi 虚拟摄像头驱动正常
完成前一步骤后,可以确认 Camera 软硬件功能正常。接下来,需要验证 svivi 虚拟摄像头驱动的可用性,为后续将 Camera 适配至 OH 框架做好准备。
首先,需要按照以下步骤简单调整前面生成的 JSON 配置:
-
新增
"use_v4l":1字段,将cam-test切换至 V4L2 功能模式{
"tuning_server_enable":1,
"show_fps":1,
"auto_run": 0,
//新增 "use_v4l":1,
"use_v4l":1,
......
} -
重命名 JSON 文件并放置目录
- 若摄像头为后摄,将文件重命名为
svivi_cam1.json - 若摄像头为前摄,将文件重命名为
svivi_cam2.json - 并将文件放置于
/system/profile/目录下
- 若摄像头为后摄,将文件重命名为
-
使用
v4l2_test_spacemit执行下列命令测试 svivi 虚拟摄像头驱动。- 如果使用的摄像头是后摄,则操作
/dev/video23,执行的命令如下:v4l2_test_spacemit --device /dev/video23 --set-fmt-video width=1920,height=1080,pixelformat=NV12 --verbose --stream-dmabuf --stream-loop --stream-save 10 --stream-to=/data/test.yuv - 如果使用的摄像头是前摄,则操作
/dev/video24,执行的命令如下:v4l2_test_spacemit --device /dev/video24 --set-fmt-video width=1920,height=1080,pixelformat=NV12 --verbose --stream-dmabuf --stream-loop --stream-save 10 --stream-to=/data/test.yuv - 测试正常时,终端将显示类似如下输出:
#v4l2_test_spacemit --device /dev/video24 --set-fmt-video width=1920,height=1080,pixelformat=NV12 --verbose --stream-dmabuf --stream-loop  --stream-save 10 --stream-to=test.yuv
stream_save:10
main:847 [WARN]can't get codec type

VIDIOC_G_FMT: ok, type:9
VIDIOC_S_FMT: ok, type:9
Format Video Capture Multiplanar:
        Width/Height      : 1920/1080
        Pixel Format      : 'NV12'  (Y/UV 4:2:0)
        Field             : None
        Number of planes  : 1
        Colorspace        : sRGB
        Plane 0           :
           Bytes per Line : 1920
           Size Image     : 2073600
start buffer preprocessing
VIDIOC_REQBUFS: ok, type:9, count:4
VIDIOC_QUERYBUF: ok, type:9
        Index    : 0
        Type     : V4L2_BUF_TYPE_VIDEO_CAPTURE_MPLANE
        Flags    : 0
        Field    : 1
        Sequence : 0
        Length   : 1
        Bytesused: 0
        Timestamp: 0.000000s
        Plane    : 0
                Length     : 3110400
                Bytesused  : 3110400
                Data Offset: 0

VIDIOC_QBUF: ok, type:9
VIDIOC_QUERYBUF: ok, type:9
VIDIOC_QBUF: ok, type:9
VIDIOC_QUERYBUF: ok, type:9
VIDIOC_QBUF: ok, type:9
VIDIOC_QUERYBUF: ok, type:9
VIDIOC_QBUF: ok, type:9
start buffer queue
start to VIDIOC_STREAMON
VIDIOC_STREAMON: ok, type:9
start select.
VIDIOC_DQBUF: ok, type:9
write_buffer_to_file:661 [INFO]capture w2f: 1 0 p:0x3f3b2c8000 0, 3110400
VIDIOC_QBUF: ok, type:9
do_handle_cap:736 [INFO]m2m capture dequeue----------------: 1
start select.
VIDIOC_DQBUF: ok, type:9
write_buffer_to_file:661 [INFO]capture w2f: 1 1 p:0x3f3afd0000 0, 3110400
VIDIOC_QBUF: ok, type:9
do_handle_cap:736 [INFO]m2m capture dequeue----------------: 2
start select.
VIDIOC_DQBUF: ok, type:9
write_buffer_to_file:661 [INFO]capture w2f: 1 2 p:0x3f3acd8000 0, 3110400
VIDIOC_QBUF: ok, type:9
do_handle_cap:736 [INFO]m2m capture dequeue----------------: 3
start select.
VIDIOC_DQBUF: ok, type:9
write_buffer_to_file:661 [INFO]capture w2f: 1 3 p:0x3f3a9e0000 0, 3110400
VIDIOC_QBUF: ok, type:9
do_handle_cap:736 [INFO]m2m capture dequeue----------------: 4
start select.
VIDIOC_DQBUF: ok, type:9
write_buffer_to_file:661 [INFO]capture w2f: 1 0 p:0x3f3b2c8000 0, 3110400
VIDIOC_QBUF: ok, type:9
do_handle_cap:736 [INFO]m2m capture dequeue----------------: 5
start select.
VIDIOC_DQBUF: ok, type:9
write_buffer_to_file:661 [INFO]capture w2f: 1 1 p:0x3f3afd0000 0, 3110400
VIDIOC_QBUF: ok, type:9
do_handle_cap:736 [INFO]m2m capture dequeue----------------: 6
start select.
VIDIOC_DQBUF: ok, type:9
write_buffer_to_file:661 [INFO]capture w2f: 1 2 p:0x3f3acd8000 0, 3110400
VIDIOC_QBUF: ok, type:9
do_handle_cap:736 [INFO]m2m capture dequeue----------------: 7
start select.
VIDIOC_DQBUF: ok, type:9
write_buffer_to_file:661 [INFO]capture w2f: 1 3 p:0x3f3a9e0000 0, 3110400
VIDIOC_QBUF: ok, type:9
do_handle_cap:736 [INFO]m2m capture dequeue----------------: 8
start select.
VIDIOC_DQBUF: ok, type:9
write_buffer_to_file:661 [INFO]capture w2f: 1 0 p:0x3f3b2c8000 0, 3110400
VIDIOC_QBUF: ok, type:9
do_handle_cap:736 [INFO]m2m capture dequeue----------------: 9
start select.
VIDIOC_DQBUF: ok, type:9
write_buffer_to_file:661 [INFO]capture w2f: 1 1 p:0x3f3afd0000 0, 3110400
VIDIOC_QBUF: ok, type:9
do_handle_cap:736 [INFO]m2m capture dequeue----------------: 10
start select.
VIDIOC_DQBUF: ok, type:9
VIDIOC_QBUF: ok, type:9
do_handle_cap:736 [INFO]m2m capture dequeue----------------: 11
start select.
VIDIOC_DQBUF: ok, type:9
VIDIOC_QBUF: ok, type:9
do_handle_cap:736 [INFO]m2m capture dequeue----------------: 12
start select.
VIDIOC_DQBUF: ok, type:9
VIDIOC_QBUF: ok, type:9
do_handle_cap:736 [INFO]m2m capture dequeue----------------: 13
start select.
VIDIOC_DQBUF: ok, type:9
VIDIOC_QBUF: ok, type:9
do_handle_cap:736 [INFO]m2m capture dequeue----------------: 14
start select.
VIDIOC_DQBUF: ok, type:9
VIDIOC_QBUF: ok, type:9
do_handle_cap:736 [INFO]m2m capture dequeue----------------: 15
start select.
VIDIOC_DQBUF: ok, type:9
VIDIOC_QBUF: ok, type:9
do_handle_cap:736 [INFO]m2m capture dequeue----------------: 16
start select.

handle_sig
VIDIOC_DQBUF: ok, type:9
VIDIOC_QBUF: ok, type:9
do_handle_cap:736 [INFO]m2m capture dequeue----------------: 17

start to VIDIOC_STREAMOFF
VIDIOC_STREAMOFF: ok, type:9
exit v4l2_main!
#
注意:
- 虚拟摄像头最高支持分辨率为 1080p,且仅支持 NV12 格式。
- 若测试失败,请提供以下资料供工程师排查:
/data/svivi_cam1.log或/data/svivi_cam2.log测试日志dmesg内核打印文件- 测试情况说明
- 如果使用的摄像头是后摄,则操作
3.5.2.3 适配** C****amera** 到 OH 框架
操作步骤如下:
-
参考标案路径
device/board/spacemit/musepaper2/camera/代码,将相关代码移植至目标方案目录device/board/spacemit``/xxx/``camera/ -
需要确保
device/board/spacemit``/xxx/``camera/vdi_impl/v4l2/svivi_cam1.json和svivi_cam2.json用的是前面步骤调试好的 JSON 文件 -
编译烧写固件,启动系统,打开相机,观察图像输出是否正常。若摄像头无法正常输出图像,请提供以下调试资料以便工程师分析:
/data/svivi_cam1.log或/data/svivi_cam2.log测试日志dmesg内核打印文件hilog测试日志- 测试情况说明
3.5.3. USB Camera 通路定制
USB 摄像头通路可以通过修改以下配置文件实现灵活定制:
vendor/spacemit/xxx/hdf_config/uhdf/camera/hdi_impl/camera_host_config.hcs
通过该配置文件,可支持多种应用场景(最大支持 2 路摄像头):
- 双 USB 摄像头切换预览
- 双 MIPI 摄像头切换预览
- 单 USB 摄像头 + 单 MIPI 摄像头预览
- 单 USB 摄像头预览
- 单 MIPI 摄像头预览
要实现以上定制化功能,需要在 camera_host_config.hcs 中定义四个 ability 节点,每个节点都代表一个相机。
-
cameraPosition 属性说明:
OHOS_CAMERA_POSITION_BACK/OHOS_CAMERA_POSITION_FRONT:对应位置的摄像头将被 Camera HAP 打开使用。OHOS_CAMERA_POSITION_OTHER:该节点将被忽略,不会启用。
-
节点对应关系:在
camera_host_config.hcs中ability_01与ability_02:分别对应第 1、2 个 MIPI 摄像头ability_03与ability_04:分别对应第 1、2 个 USB 摄像头
注意: 目前最多支持两路摄像头切换使用。
当拔掉 USB 相机后,需先退出相机应用再重新打开使用。并确保重新打开相机时候,使用到的 USB/MIPI 摄像头仍插着,否则将导致相机应用黑屏!
上述功能已经在 smt001 方案进行验证,在支持新方案时可以作为参考。下面将针对上面几种常用情况,分别举例进行说明:
3.5.3.1 双 USB 摄像头切换预览场景
在该配置中,lcam003 对应后摄,lcam004 对应前摄,也可以根据需求,调整前后摄位置,以及预览分辨(录像、拍照分辨率和预览分辨率大小一样)。
注意:在拔插 USB 摄像头后,需要重启相机应用才能正常预览。
配置示例:
root {
    module="sample";
    vdiLibList = [
        "libcamera_host_vdi_impl_1.0.z.so"
    ];
    camera_host_config {
        match_attr = "camera_host_interface";
        template ability {
            logicCameraId = "lcam001";
            physicsCameraIds = [
                "CAMERA_FIRST"
            ];
            metadata {
                aeAvailableAntiBandingModes = [
                    "OHOS_CONTROL_AE_ANTIBANDING_MODE_OFF",
                    "OHOS_CONTROL_AE_ANTIBANDING_MODE_50HZ",
                    "OHOS_CONTROL_AE_ANTIBANDING_MODE_60HZ",
                    "OHOS_CONTROL_AE_ANTIBANDING_MODE_AUTO"
                ];
                aeAvailableModes = ["OHOS_CONTROL_AE_MODE_ON"];
                availableFpsRange = [15, 30];
                aeCompensationRange = [0, 0];
                aeCompensationSteps = [0, 1];
                availableAwbModes = [
                    "OHOS_CONTROL_AWB_MODE_OFF"
                ];
                sceneModesOverrides = [
                    "OHOS_CONTROL_AE_MODE_ON",
                    "OHOS_CONTROL_AWB_MODE_AUTO"
                ];
                aeLockAvailable = "OHOS_CONTROL_AE_LOCK_AVAILABLE_FALSE";
                awbLockAvailable = "OHOS_CONTROL_AWB_LOCK_AVAILABLE_FALSE";
                sensitivityRange = [32, 2400];
                exposureTimeRange = [100000, 200000000];
                faceDetectMode = "OHOS_STATISTICS_FACE_DETECT_MODE_OFF";
                maxFaceCount = 0;
                flashAvailable = "OHOS_FLASH_INFO_AVAILABLE_FALSE";
                lensFacing = "OHOS_LENS_FACING_FRONT";
                opticalStabilizations = ["OHOS_LENS_OPTICAL_STABILIZATION_MODE_OFF"];
                maxDigitalZoom = "1";
                availableCharacteristicsKeys = [
                    ...
                ];
                availableRequestKeys = [
                    ...
                ];
                availableResultKeys = [
                    ...
                ];
            }
        }
        ability_01 :: ability {
            ...
        }
        ability_02 :: ability {
            ...
        }
**        **ability_03 :: ability {
            logicCameraId = "lcam003";
            physicsCameraIds = [
                "CAMERA_THIRD"
            ];
            metadata {
                aeAvailableAntiBandingModes = [
                    "OHOS_CAMERA_AE_ANTIBANDING_MODE_OFF"
                ];
                aeAvailableModes = ["OHOS_CAMERA_AE_MODE_OFF"];
                availableFpsRange = [5, 10];
                cameraPosition = "OHOS_CAMERA_POSITION_BACK";
                cameraType = "OHOS_CAMERA_TYPE_WIDE_ANGLE";
                cameraConnectionType ="CAMERA_CONNECTION_USB_PLUGIN";
                cameraMemoryType ="OHOS_CAMERA_MEMORY_USERPTR";
                faceDetectMaxNum = "10";
                aeCompensationRange = [0, 0];
                aeCompensationSteps = [0, 0];
                availableAwbModes = [
                    "OHOS_CAMERA_AWB_MODE_OFF"
                ];
                sensitivityRange = [32, 2400];
                faceDetectMode = "OHOS_CAMERA_FACE_DETECT_MODE_OFF";
                availableCharacteristicsKeys = [
                    ...
                ];
                availableRequestKeys = [
                    ...
                ];
                availableResultKeys = [
                    ...
                ];
                focalLength = "24.0";
                focusAvailableModes = [
                    ...
                ];
                exposureAvailableModes = [
                    ...
                ];
                meterAvailableModes = [
                    ...
                ];
                flashAvailableModes = [
                    ...
                ];
                mirrorSupported = "OHOS_CAMERA_MIRROR_ON";
                basicAvailableConfigurations = [
                    1, 640, 480,
                    1, 1080, 720,
                    1, 1280, 960,
                    1, 1920, 1080,
                    4, 640, 480,
                    4, 1080, 720,
                    4, 1280, 960,
                    4, 1920, 1080
                    ];
                sensorOrientationSupported = "270";
                videoStabilizationAvailableModes = [
                    "OHOS_CAMERA_VIDEO_STABILIZATION_OFF"
                ];
                flashAvailable = "OHOS_CAMERA_FLASH_FALSE";
                afAvailable = [
                    "OHOS_CAMERA_AF_MODE_OFF"
                ];
                zoomRatioRange = [
                    "1.0",
                    "1.0"
                ];
                jpegOrientation= "270";
                jpegQuality= "2";
            }
        }
        ability_04 :: ability {
            logicCameraId = "lcam004";
            physicsCameraIds = [
                "CAMERA_FOURTH"
            ];
            metadata {
                aeAvailableAntiBandingModes = [
                    "OHOS_CAMERA_AE_ANTIBANDING_MODE_OFF"
                ];
                aeAvailableModes = ["OHOS_CAMERA_AE_MODE_OFF"];
                availableFpsRange = [5, 10];
                cameraPosition = "OHOS_CAMERA_POSITION_FRONT";
                cameraType = "OHOS_CAMERA_TYPE_WIDE_ANGLE";
                cameraConnectionType ="CAMERA_CONNECTION_USB_PLUGIN";
                cameraMemoryType ="OHOS_CAMERA_MEMORY_USERPTR";
                faceDetectMaxNum = "10";
                aeCompensationRange = [0, 0];
                aeCompensationSteps = [0, 0];
                availableAwbModes = [
                    "OHOS_CAMERA_AWB_MODE_OFF"
                ];
                sensitivityRange = [32, 2400];
                faceDetectMode = "OHOS_CAMERA_FACE_DETECT_MODE_OFF";
                availableCharacteristicsKeys = [
                    ...
                ];
                availableRequestKeys = [
                    ...
                ];
                availableResultKeys = [
                    ...
                ];
                focalLength = "24.0";
                focusAvailableModes = [
                    ...
                ];
                exposureAvailableModes = [
                    ...
                ];
                meterAvailableModes = [
                    ...
                ];
                flashAvailableModes = [
                    ...
                ];
                mirrorSupported = "OHOS_CAMERA_MIRROR_ON";
                basicAvailableConfigurations = [
                    1, 1280, 720,
                    1, 1080, 720,
                    1, 1280, 960,
                    1, 1920, 1080,
                    4, 640, 480,
                    4, 1080, 720,
                    4, 1280, 960,
                    4, 1920, 1080
                    ];
                sensorOrientationSupported = "270";
                videoStabilizationAvailableModes = [
                    "OHOS_CAMERA_VIDEO_STABILIZATION_OFF"
                ];
                flashAvailable = "OHOS_CAMERA_FLASH_FALSE";
                afAvailable = [
                    "OHOS_CAMERA_AF_MODE_OFF"
                ];
                zoomRatioRange = [
                    "1.0",
                    "1.0"
                ];
                jpegOrientation= "270";
                jpegQuality= "2";
            }
        }
    }
}
3.5.3.2 双 MIPI 摄像头切换预览场景
在该配置中,lcam001 对应后摄,lcam002 对应前摄,也可以根据需求,调整前后摄位置,以及预览分辨(录像、拍照分辨率和预览分辨率大小一样)。
配置示例:
root {
        ......
        ability_01 :: ability {
            logicCameraId = "lcam001";
            physicsCameraIds = [
                "CAMERA_FIRST"
            ];
            metadata {
                aeAvailableAntiBandingModes = [
                    "OHOS_CAMERA_AE_ANTIBANDING_MODE_OFF"
                ];
                aeAvailableModes = ["OHOS_CAMERA_AE_MODE_OFF"];
                availableFpsRange = [5, 10];
                cameraPosition = "OHOS_CAMERA_POSITION_BACK";
                ......
            }
        }
        ability_02 :: ability {
            logicCameraId = "lcam002";
            physicsCameraIds = [
                "CAMERA_SECOND"
            ];
            metadata {
                aeAvailableAntiBandingModes = [
                    "OHOS_CAMERA_AE_ANTIBANDING_MODE_OFF"
                ];
                aeAvailableModes = ["OHOS_CAMERA_AE_MODE_OFF"];
                availableFpsRange = [5, 10];
                cameraPosition = "OHOS_CAMERA_POSITION_FRONT";
                ......
            }
        }
        ability_03 :: ability {
                ......
        }
        ability_04 :: ability {
                ......
        }
    }
}
3.5.3.3 单 USB 摄像头 + 单 MIPI 摄像头预览场景
在该配置中,lcam001 对应 MIPI 后摄,lcam003 对应 USB 前摄,也可以根据需求,调整前后摄位置,以及预览分辨(录像、拍照分辨率和预览分辨率大小一样)。
配置示例:
root {
        ......
        ability_01 :: ability {
            logicCameraId = "lcam001";
            physicsCameraIds = [
                "CAMERA_FIRST"
            ];
            metadata {
                ......
                cameraPosition = "OHOS_CAMERA_POSITION_BACK";
                ......
            }
        }
        ability_02 :: ability {
            logicCameraId = "lcam002";
            physicsCameraIds = [
                "CAMERA_SECOND"
            ];
            metadata {
                ......
                cameraPosition = "OHOS_CAMERA_POSITION_OTHER";
                ......
            }
        }
        ability_03 :: ability {
            logicCameraId = "lcam003";
            physicsCameraIds = [
                "CAMERA_THIRD"
            ];
            metadata {
                ......
                cameraPosition = "OHOS_CAMERA_POSITION_FRONT";
                ......
            }
        }
        ability_04 :: ability {
            logicCameraId = "lcam004";
            physicsCameraIds = [
                "CAMERA_FOURTH"
            ];
            metadata {
                ......
                cameraPosition = "OHOS_CAMERA_POSITION_OTHER";
                ......
            }
        }
    }
}
3.5.3.4 单 USB 摄像头预览场景
在该配置中,lcam003 对应 USB 后摄,也可以根据需求,调整预览分辨大小(录像、拍照分辨率和预览分辨率大小一样),或者前后摄配置。
配置示例:
root {
        ......
        ability_01 :: ability {
            logicCameraId = "lcam001";
            physicsCameraIds = [
                "CAMERA_FIRST"
            ];
            metadata {
                ......
                cameraPosition = "OHOS_CAMERA_POSITION_OTHER";
                ......
            }
        }
        ability_02 :: ability {
            logicCameraId = "lcam002";
            physicsCameraIds = [
                "CAMERA_SECOND"
            ];
            metadata {
                ......
                cameraPosition = "OHOS_CAMERA_POSITION_OTHER";
                ......
            }
        }
        ability_03 :: ability {
            logicCameraId = "lcam003";
            physicsCameraIds = [
                "CAMERA_THIRD"
            ];
            metadata {
                ......
                cameraPosition = "OHOS_CAMERA_POSITION_BACK";
                ......
            }
        }
        ability_04 :: ability {
            logicCameraId = "lcam004";
            physicsCameraIds = [
                "CAMERA_FOURTH"
            ];
            metadata {
                ......
                cameraPosition = "OHOS_CAMERA_POSITION_OTHER";
                ......
            }
        }
    }
}
3.5.3.5 单 MIPI 摄像头预览场景
在该配置中,lcam001 对应 MIPI 后摄,也可以根据需求,调整预览分辨大小(录像、拍照分辨率和预览分辨率大小一样)。
注意:当只有一个摄像头时,不能定义 OHOS_CAMERA_POSITION_FRONT 状态。
配置示例��:
root {
        ......
        ability_01 :: ability {
            logicCameraId = "lcam001";
            physicsCameraIds = [
                "CAMERA_FIRST"
            ];
            metadata {
                ......
                cameraPosition = "OHOS_CAMERA_POSITION_BACK";
                ......
            }
        }
        ability_02 :: ability {
            logicCameraId = "lcam002";
            physicsCameraIds = [
                "CAMERA_SECOND"
            ];
            metadata {
                ......
                cameraPosition = "OHOS_CAMERA_POSITION_OTHER";
                ......
            }
        }
        ability_03 :: ability {
            logicCameraId = "lcam003";
            physicsCameraIds = [
                "CAMERA_THIRD"
            ];
            metadata {
                ......
                cameraPosition = "OHOS_CAMERA_POSITION_OTHER";
                ......
            }
        }
        ability_04 :: ability {
            logicCameraId = "lcam004";
            physicsCameraIds = [
                "CAMERA_FOURTH"
            ];
            metadata {
                ......
                cameraPosition = "OHOS_CAMERA_POSITION_OTHER";
                ......
            }
        }
    }
}
3.5.4 硬件编解码通路定制
待添加
3.6 支持存储外设
支持存储外设的方法基本都是在 foundation/filemanagement/storage_service/services/storage_daemon/disk_config 中配置存储路径。
3.6.1 支持 U 盘
在 foundation/filemanagement/storage_service/services/storage_daemon/services/storage_daemon/disk_config 中,添加配置如下:
sysPattern /devices/platform/soc/c0900100.udc/* label disk flag 0
sysPattern /devices/platform/soc/c0980100.ehci1/* label disk flag 0
sysPattern /devices/platform/soc/d4282bc8.usb3/c0a00000.dwc3/* label disk flag 0
正常情况下,插入 U 盘,内核会有识别和挂载的相关打印,如下:
  900.645659] usb 1-1.2: new high-speed USB device number 6 using mv-ehci
[  900.777124] usb-storage 1-1.2:1.0: USB Mass Storage device detected
[  900.784363] scsi host0: usb-storage 1-1.2:1.0
[  900.789390] [I/USB_PNP_NOTIFY] UsbPnpNotifyCallback: action=0x1\x0d
[  900.795540] [I/USB_PNP_NOTIFY] UsbPnpNotifyAddInitInfo:207 i=0, interfaceInfo=0x8-0x6-0x50-0x0\x0d
[  900.804612] [I/USB_PNP_NOTIFY] UsbPnpNotifyReportThread: UsbPnpNotifyReportThread start!\x0d
[  900.813047] [I/USB_PNP_NOTIFY] UsbPnpNotifyHdfSendEvent:373 device information, 3 usbDevAddr=18446743907588270080, devNum=6, busNum=1, infoTable=1-0x2ba3-0x1220!\x0d
[  901.803764] scsi 0:0:0:0: Direct-Access     Generic- SD/MMC           1.00 PQ: 0 ANSI: 6
[  902.301131] sd 0:0:0:0: [sda] 61962240 512-byte logical blocks: (31.7 GB/29.5 GiB)
[  902.311249] sd 0:0:0:0: [sda] Write Protect is off
[  902.316369] sd 0:0:0:0: [sda] Mode Sense: 23 00 00 00
[  902.323998] sd 0:0:0:0: [sda] Write cache: disabled, read cache: disabled, doesn't support DPO or FUA
[  902.343818] sd 0:0:0:0: [sda] Attached SCSI removable disk
[  902.344243] StorageDaemon: [IsMatch:38] config sysPattern /devices/platform/soc/d4280000.sdh/mmc_host/mmc0/*, device sysPattern /devices/platform/soc/c0980100.ehci1/usb1/1-1/1-1.2/1-1.2:1.0/host0/target0:0:0/0:0:0:0/block/sda
[  902.345181] [pid=172][ueventd][INFO][ueventd_device_handler.c:85]symlink /dev/block/sda->/dev/block/platform/soc/c0980100.ehci1/sda
[  902.370378] StorageDaemon: [IsMatch:38] config sysPattern /devices/platform/soc/c0900100.udc/*, device sysPattern /devices/platform/soc/c0980100.ehci1/usb1/1-1/1-1.2/1-1.2:1.0/host0/target0:0:0/0:0:0:0/block/sda
[  902.401442] StorageDaemon: [IsMatch:38] config sysPattern /devices/platform/soc/d4282bc8.usb3/c0a00000.dwc3/*, device sysPattern /devices/platform/soc/c0980100.ehci1/usb1/1-1/1-1.2/1-1.2:1.0/host0/target0:0:0/0:0:0:0/block/sda
[  902.421825] StorageDaemon: [IsMatch:38] config sysPattern /devices/platform/soc/c0980100.ehci1/*, device sysPattern /devices/platform/soc/c0980100.ehci1/usb1/1-1/1-1.2/1-1.2:1.0/host0/target0:0:0/0:0:0:0/block/sda
[  902.442433] StorageDaemon: [ReadMetadata:178] Read metadata /sys/devices/platform/soc/c0980100.ehci1/usb1/1-1/1-1.2/1-1.2:1.0/host0/target0:0:0/0:0:0:0/block/sda/device/vendor
[  902.490636] StorageDaemon: [CreateUnknownTabVol:239] disk-8-0 has unknown table
[  902.583652] StorageDaemon: [ReadMetadata:93] ReadMetadata, fsUuid=6******9, fsType=ntfs, fsLabel=.
[  902.592817] StorageDaemon: [CreateVolume:320] disk read volume metadata
[  902.599618] StorageDaemon: [CreateVolume:55] create volume vol-8-0.
[  902.607288] StorageDaemon: [Check:116] Handle Check
[  902.695922] StorageDaemon: [ReadMetadata:93] ReadMetadata, fsUuid=6******9, fsType=ntfs, fsLabel=.
[  902.752558] StorageDaemon: [Mount:84] Handle Mount
[  902.841254] StorageDaemon: [ReadMetadata:93] ReadMetadata, fsUuid=6******9, fsType=ntfs, fsLabel=.
[  902.888210] StorageDaemon: [DoMount:176] Ready to mount: external volume fstype is ntfs, mountflag is 0
执行 mount 命令,会看到 U 盘已经挂载,如下:
...
/dev/block/vol-8-0 on /mnt/data/external/662A30B72A308659 type fuseblk (rw,relatime,user_id=0,group_id=0,default_permissions,allow_other,blksize=4096)
...
3.6.2 支持 TF 卡
在 foundation/filemanagement/storage_service/services/storage_daemon/services/storage_daemon/disk_config 中,添加配置如下:
sysPattern /devices/platform/soc/d4280000.sdh/mmc_host/mmc0/* label disk flag 0
3.6.3 支持 SSD 硬盘
在 foundation/filemanagement/storage_service/services/storage_daemon/services/storage_daemon/disk_config 中,添加配置如下:
sysPattern /devices/platform/soc/ca800000.pcie/* label disk flag 0
sysPattern /devices/platform/soc/ca400000.pcie/* label disk flag 0
3.7 恢复出厂模式定制
待添加
3.8 添加环境变量
3.8.1 查看现有环境变量
# env

_=/bin/env
HOME=/
PULSE_STATE_PATH=/data/data/.pulse_dir/state
PULSE_RUNTIME_PATH=/data/data/.pulse_dir/runtime
TERM=linux
default_boot_device=soc/d4281000.sdh
DOWNLOAD_CACHE=/data/cache
TMPDIR=/data/local/tmp
PATH=/usr/local/bin:/bin:/usr/bin
UBSAN_OPTIONS=log_path=/dev/ubsan/ubsan.log:print_stacktrace=1:print_module_map=2:log_exe_name=1
3.8.2 添加新的环境变量
新建 xxx.cfg 文件,添加需要添加的环境变量。然后将文件推送到开发板 /system/etc/init 目录下,重启即可生效。
{
    "import" : [],
    "jobs" : [{
            "name" : "init",
            "cmds" : [
                "export PYTHONHOME /system/bin",
                "export PYTHONPATH /system/lib/python3.8:/system/lib/python3.8/lib-dynload",
                "export LD_LIBRARY_PATH /system/lib/python3.8/lib-dynload",
                "export PATH /usr/local/bin:/bin:/usr/bin:/bin/bin:/system/bin/bin",
                "start python_oh"
            ]
        }
    ],
    "services" : [{
            "name" : "python_oh",
            "path" : ["/system/bin/ls"]
        }
    ]
}
如果是手动临时添加环境变量,可执行以下命令:
export PYTHONHOME=/system/bin
export PYTHONPATH=/system/lib/python3.8:/system/lib/python3.8/lib-dynload
export LD_LIBRARY_PATH=/system/lib/python3.8/lib-dynload:$LD_LIBRARY_PATH
export PATH=$PATH:/bin/bin
export PATH=$PATH:/system/bin/bin
注意:
-
在
.cfg文�件中添加环境变量时,不要使用等号(=)。- 正确写法:
export PYTHONHOME /system/bin - 错误写法:
export PYTHONHOME=/system/bin
- 正确写法:
-
在设置
export PATH=$PATH:/bin/bin和export PATH=$PATH:/system/bin/bin时,需在.cfg文件里写成完整路径。例如:export PATH /usr/local/bin:/bin:/usr/bin:/bin/bin:/system/bin/bin其中:
-
/usr/local/bin:/bin:/usr/bin为 OpenHarmony 系统默认路径; -
/bin/bin:/system/bin/bin为自定义新增路径。
3.9 修改 system 分区大小
需要修改 2 个地方:
-
分区表,将 system 分区的 size 从 2048M 改为 4096M。注意,后面的分区参数也要对应的修改
fuqiang@snode2:~/workspace/oh5/device/board/spacemit$ git diff
diff --git a/zt001h/kernel/boot/partition_universal.json b/zt001h/kernel/boot/partition_universal.json
index 2d6e7f3..beab872 100755
--- a/zt001h/kernel/boot/partition_universal.json
+++ b/zt001h/kernel/boot/partition_universal.json
@@ -71,18 +71,18 @@
         {
             "name": "system",
             "offset": "464M",
-            "size": "2048M",
+            "size": "4096M",
             "image": "system.img"
         },
         {
             "name": "vendor",
-            "offset": "2512M",
+            "offset": "4560M",
             "size": "512M",
             "image": "vendor.img"
         },
         {
             "name": "userdata",
-            "offset": "3024M",
+            "offset": "5072M",
             "size": "-",
             "image": "userdata.img"
} -
分区配置文件
fuqiang@snode2:~/workspace/oh5/vendor/spacemit$ git diff
diff --git a/zt001h/image_conf/system_image_conf.txt b/zt001h/image_conf/system_image_conf.txt
index a165557..c8a8ad6 100755
--- a/zt001h/image_conf/system_image_conf.txt
+++ b/zt001h/image_conf/system_image_conf.txt
@@ -1,4 +1,4 @@
 /
-2097152000
+4194304000
 --fs_type=ext4
 --dac_config ../../build/ohos/images/mkimage/dac.txt
4. 内核定制
4.1 修改内核 defconfig 配置
内核 defconfig 的位置在:
kernel/linux/spacemit_kernel-6.6/arch/riscv/configs/k1_defconfig
修改后,单独编译内核��然后打包即可,如下:
./build.sh --product-name xxx --ccache --prebuilt-sdk -T build_kernel
./build/gen_zip.sh xxx
4.2 修改内核 dts 配置
内核的 dts 配置的位置在:
kernel/linux/spacemit_kernel-6.6/arch/riscv/boot/dts/spacemit
如下所示:
|-- k1-x-camera-reserved-mm.dtsi
|-- k1-x-camera-sdk.dtsi
|-- k1-x-camera-sensor.dtsi
|-- k1-x_deb1.dts
|-- k1-x_deb2.dts
|-- k1-x.dtsi
|-- k1-x-efuse.dtsi
|-- k1-x_evb.dts
|-- k1-x-hdmi.dtsi
|-- k1-x_hs450.dts
|-- k1-x_kx312.dts
|-- k1-x-lcd.dtsi
|-- k1-x_lpi3a.dts
|-- k1-x_milkv-jupiter.dts
|-- k1-x_mingo.dts
|-- k1-x_MINI-PC.dts
|-- k1-x_MUSE-Book.dts
|-- k1-x_MUSE-Card.dts
|-- k1-x_MUSE-N1.dts
|-- k1-x_MUSE-Paper2.dts
|-- k1-x_MUSE-Paper.dts
|-- k1-x_MUSE-Paper-mini-4g.dts
|-- k1-x_MUSE-Pi.dts
|-- k1-x_opp_table.dtsi
|-- k1-x_pinctrl.dtsi
|-- k1-x_SMT001.dts
|-- k1-x_thermal_cooling.dtsi
|-- k1-x_ZT001H.dts
|-- lcd
|   |-- lcd_ft8201sinx101_mipi.dtsi
|   |-- lcd_gc9503v_mipi.dtsi
|   |-- lcd_gx09inx101_mipi.dtsi
|   |-- lcd_icnl9911c_mipi.dtsi
|   |-- lcd_icnl9951r_mipi.dtsi
|   |-- lcd_jd9365dah3_mipi.dtsi
|   |-- lcd_jd9365da_mipi_1280x800.dtsi
|   |-- lcd_lt8911_edp_1920x1080.dtsi
|   |-- lcd_lt8911_edp_1920x1200.dtsi
|   |-- lcd_lt9711_dp_1920x1080.dtsi
|   `-- lcd_orisetech_ota7290b_mipi.dtsi
|-- m1-x_milkv-jupiter.dts
`-- Makefile
修改对应方案的 dts 配置后,单独编译内核然后打包即可,如下:
./build.sh --product-name xxx --ccache --prebuilt-sdk -T build_kernel
./build/gen_zip.sh xxx
4.3 添加需要加载的 ko 文件
如果需要将内核编译出来的 .ko 文件在系统开机的时候加载,需要修改 OpenHarmony 上层的配置,主要分为 2 步:
4.3.1. 拷贝 .ko 文件
在 device/board/spacemit/xxx/kernel 的 build_kernel.sh 中进行拷贝,如下:
function cp_ko(){
  # cp ko to userspace
  cp ${KERNEL_BUILD_ROOT}/drivers/usb/typec/typec.ko ${OHOS_SOURCE_ROOT}/device/board/${DEVICE_BOARD}/${DEVICE_NAME}/kernel/ko
  cp ${KERNEL_BUILD_ROOT}/drivers/usb/typec/husb239.ko ${OHOS_SOURCE_ROOT}/device/board/${DEVICE_BOARD}/${DEVICE_NAME}/kernel/ko
  cp ${KERNEL_BUILD_ROOT}/drivers/net/wireless/realtek/rtl8852be/8852be.ko ${OHOS_SOURCE_ROOT}/device/board/${DEVICE_BOARD}/${DEVICE_NAME}/kernel/ko
  cp ${KERNEL_BUILD_ROOT}/drivers/net/wireless/realtek/rtl8852bs/8852bs.ko ${OHOS_SOURCE_ROOT}/device/board/${DEVICE_BOARD}/${DEVICE_NAME}/kernel/ko
}
在编译完内核后,将内核编译目录下的 .ko 文件拷贝到 OpenHarmony 系统的目录下。
4.3.2. 加载 .ko 文件
在 device/board/spacemit/xxx/cfg 的 init.xxx.cfg 中进行 .ko 文件的加载,如下:
{
  "name" : "fs",
    "cmds" : [
      "insmod /vendor/modules/8852bs.ko ifname=wlan0 if2name=p2p0",
      "insmod /vendor/modules/typec.ko",
      "insmod /vendor/modules/husb239.ko"
    ]
},
开机后,会在 init 进程中,加载这些 .ko 文件。
4.4. 给内核打补丁
先将对内核的修改生成补丁,然后将生成的补丁放置于 OpenHarmony 的配置目录下。
对于所有平台通用的补丁,放置在:
device/board/spacemit/kernel_patches/linux-6.6
对于特定平台使用的补丁,放置在:
device/board/spacemit/xxx/kernel/kernel_patch
在 device/board/spacemit/xxx/kernel 目录中的 build_kernel.sh 里面,打上相关 patch,如下:
patch -p1 <${OHOS_SOURCE_ROOT}/device/board/spacemit/kernel_patches/linux-6.6/0001-bounds_checking_function-include.patch
patch -p1 <${OHOS_SOURCE_ROOT}/device/board/spacemit/kernel_patches/linux-6.6/0002-fix-hmdfs-permission.patch
patch -p1 <${OHOS_SOURCE_ROOT}/device/board/${DEVICE_BOARD}/${DEVICE_NAME}/kernel/kernel_patch/0001-kernel-audio.patch