
ONNX Runtime
Introduction
ONNX Runtime is an open-source inference engine to run ONNX models, which enables the acceleration of machine learning models across all of your deployment targets using a single set of API. Source codes are available at https://github.com/nxp-imx/onnxruntime-imx.
For the full list of the CPU supported operators, see the operator kernelsdocumentation section:
OperatorKernels.
Features:
- ONNX Runtime 1.13.1
- Multithreaded computation with acceleration using Arm Neon SIMD instructions on Cortex-A cores provided by the CPU execution provider
- Parallel computation using GPU/NPU hardware acceleration (on shader or convolution units) provided by the NNAPI execution providers on i.MX 8
- C++ and Python API (supported Python version 3)
- ONNX Runtime 1.13.1 supports ONNX 1.10 and Opset version 18. Note: The opset only defines all the operators which are available. It does not necessarily mean they are implemented in the execution provider in use.
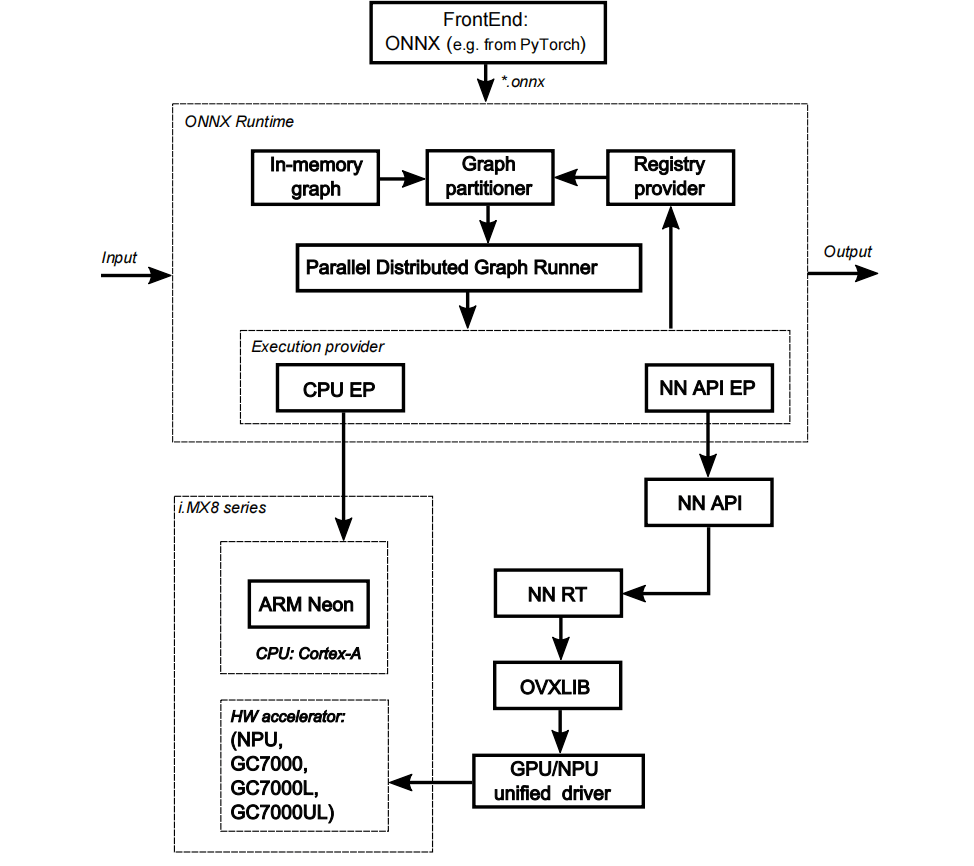
ONNX Runtime software stack
The ONNX Runtime software stack is shown in the following figure. The ONNX Runtime supports computation on the following HW units:
- CPU Arm Cortex-A cores using CPU execution provider
- GPU/NPU hardware accelerator using the NNAPI execution providers (experimental) on i.MX 8
See Section 1 for some details about supporting of computation on GPU/NPU hardware accelerator on different HW platforms.
Execution providers
Execution providers (EP) are a mechanism to delegate inference execution to an underlying framework or hardware. By default, the ONNX Runtime uses the CPU EP, which executes inference on the CPU.
Officially supported Execution Providers which provide means of acceleration compared to the default CPU EP are the following:
-
nnapi - runs either on the GPU or the NPU depending on what HW is available. Leverages the NNAPI implementation which uses OpenVX.
-
Note: The NNAPI Execution Provider is experimental
-
Note: NnapiExecutionProvider can only be used to generate ORT format model in this build
ONNX model test
ONNX Runtime provides a tool that can run the collection of standard tests provided in the ONNX Model Zoo. The tool named onnx_test_runner is installed in /usr/bin/onnxruntime-1.13.1.
ONNX models are available at https://github.com/onnx/models and consist of models and sample test data. Because some models require a lot of disk space, it is advised to store the ONNX test files on a larger partition, as described in the SD card image flashing section.
Here is an example with the steps required to run the mobilenet version 2 test:
• Download and unpack the mobilenet version 2 test archive to some folder, for example to/home/root:
$ cd /home/root
$ wget https://github.com/onnx/models/raw/main/vision/classification/mobilenet/
model/mobilenetv2-7.tar.gz
$ tar -xzvf mobilenetv2-7.tar.gz
$ ls ./mobilenetv2-7
mobilenetv2-7.onnx test_data_set_0
Run the onnx_test_runner tool providing mobilenetv2-7 folder path and setting the execution provider:
$ /usr/bin/onnxruntime-1.13.1/onnx_test_runner -j 1 -c 1 -r 1 -e [cpu/nnapi] ./
mobilenetv2-7/
result:
Models: 1
Total test cases: 3
Succeeded: 3
Not implemented: 0
Failed: 0
Stats by Operator type:
Not implemented(0):
Failed:
Failed Test Cases:
$
Note:
Use onnx_test_runner -h for the full list of supported opti
Python demo
import onnxruntime as ort
import numpy as np
import cv2
import urllib.request

# 下载 ResNet-50 模型
model_url = 'https://github.com/CiscoRachel/onnx-models/blob/main/vision/classification/resnet/model/resnet50-v2-7.onnx?raw=true'
model_path = 'resnet50.onnx'
urllib.request.urlretrieve(model_url, model_path)

# 创建 ONNX Runtime 推理会话
session = ort.InferenceSession(model_path, providers=['CPUExecutionProvider'])

# 获取模型的输入名称和输入形状
input_name = session.get_inputs()[0].name
input_shape = session.get_inputs()[0].shape

print(f"Input name: {input_name}")
print(f"Input shape: {input_shape}")

# 下载并预处理示例图像
image_url = 'https://upload.wikimedia.org/wikipedia/commons/9/9a/Pug_600.jpg'
image_path = 'pug.jpg'
urllib.request.urlretrieve(image_url, image_path)

image = cv2.imread(image_path)
image_resized = cv2.resize(image, (224, 224))
image_rgb = cv2.cvtColor(image_resized, cv2.COLOR_BGR2RGB)
image_normalized = image_rgb.astype(np.float32) / 255.0
image_transposed = np.transpose(image_normalized, (2, 0, 1))
input_data = np.expand_dims(image_transposed, axis=0)

# 运行推理
outputs = session.run(None, {input_name: input_data})

# 获取分类结果
output = outputs[0]
class_id = np.argmax(output)
confidence = output[0][class_id]

# 打印输出
print("Class ID:", class_id)
print("Confidence:", confidence)

# 在图像上标记分类结果
label = f"Class ID: {class_id}, Confidence: {confidence:.2f}"
cv2.putText(image, label, (10, 30), cv2.FONT_HERSHEY_SIMPLEX, 1, (0, 255, 0), 2)

# 保存标记后的图像
output_image_path = 'output_image.jpg'
cv2.imwrite(output_image_path, image)
print(f"Output image saved to {output_image_path}")