GoPoint User Guide
1 Introduction
GoPoint for i.MX Applications Processors is a user-friendly application that allows the user to launch preselected demonstrations included in the NXP provided Linux Board Support Package (BSP).
The GoPoint for i.MX Applications Processors is for the users who are interested in showcasing the various features and capabilities of the NXP provided SoCs. The demos included in this application are meant to be easy to run for users of all skill levels, making complex use cases accessible to anyone. Users need some knowledge when setting up equipment on Evaluation Kits (EVKs), such as changing Device Tree Blob (DTB) files.
This user guide is intended for end users of the GoPoint for i.MX Applications Processors. This document explains how to run the GoPoint for i.MX Applications Processors while also covering the included demos and how to operate them.
To use this software, users need at a minimum:
- A supported NXP Evaluation Kit (EVK)
- A display output (MIPI DSI or HDMI)
- A connected mouse
Note: Some demos require more than the minimum required equipment. To find the required materials for each demo, refer to Included demos.
2 Demo launcher
On boards where the GoPoint for i.MX Applications Processors is available, an NXP logo is displayed on the top left-hand corner of the screen. Users can start the demo launcher by clicking this logo.
![]()
After opening the program, users can launch demos using the following options shown in Figure 2:
- To filter the list, select the icon on the left to expand the filter menu. From this menu, users can select a category or subcategory that filters the demos displayed in the launcher.
- A scrollable list of all the demos supported on that EVK appears in this area with any filters applied. Clicking a demo in the launcher brings up information about the demo.
- This area displays the names, categories, and description of the demos.
- Clicking Launch Demo launches the currently selected demo. A demo can then be force-quit by clicking the Stop current demo button in the launcher (appears once a demo is started). Note: Only one demo can be launched at a time.
推荐摄像头: HIKVISION DS-E24S
3 Machine learning demos
The following demos show machine learning use cases that are possible with the Neural Processing Unit (NPU) included on-chip.
3.1 NNStreamer demos
NNStreamer is a set of GStreamer components that enable machine learning in video pipelines. The included demos use NNStreamer to create video outputs that overlay inference information onto the video.
3.1.1 Object classification
Required materials: Mouse, display, camera (if tested with camera), and Internet connection. This demo launches a GStreamer pipeline that gets a video feed from a camera or video file. It runs a classification inference on the video frames as they come in. This demo uses a pretrained quantized MobileNet V1 TFLite model. This model is trained on objects included in the ImageNet Large-Scale Visual Recognition Challenge 2012 (ILSVRC2012) object set. The result of the inference is then displayed within the video frame.
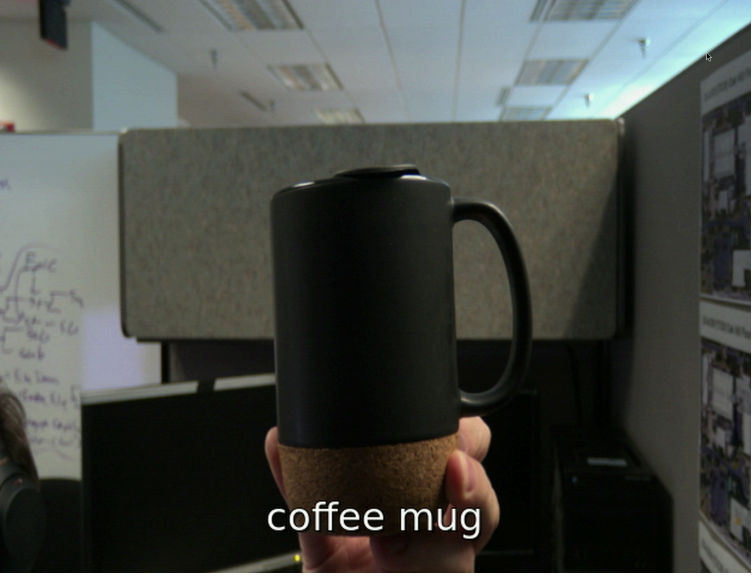
When the demo starts, a video overlay with the label with the highest probability of being in the image is displayed.
3.1.2 Object detection
Required materials: Mouse, display, camera (if tested with camera), and Internet connection. This demo launches a GStreamer pipeline that gets a video feed from a camera or video file. It runs a detection inference on the video frames as they come in. This demo uses a pretrained quantized MobileNet Single Shot Detection (SSD) V2 TFLite model. This model is trained on objects included in the Common Objects in Context (COCO) object dataset. The result of the inference is then displayed within the video frame.
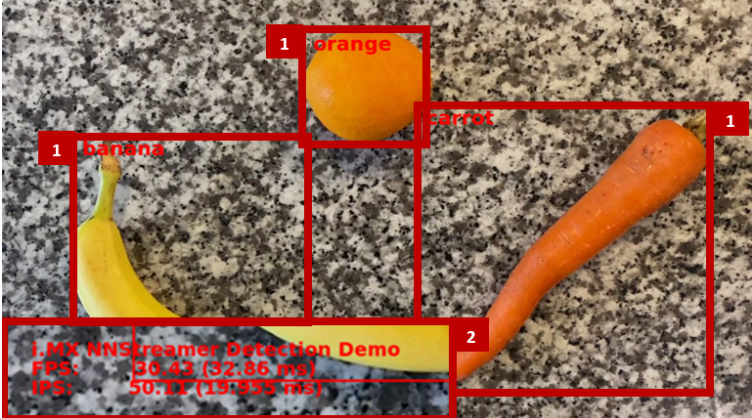
When the demo starts, a video overlay of the detected objects has boxes drawn around them, and their labels are displayed near the top-left corner.
3.1.3 Pose detection
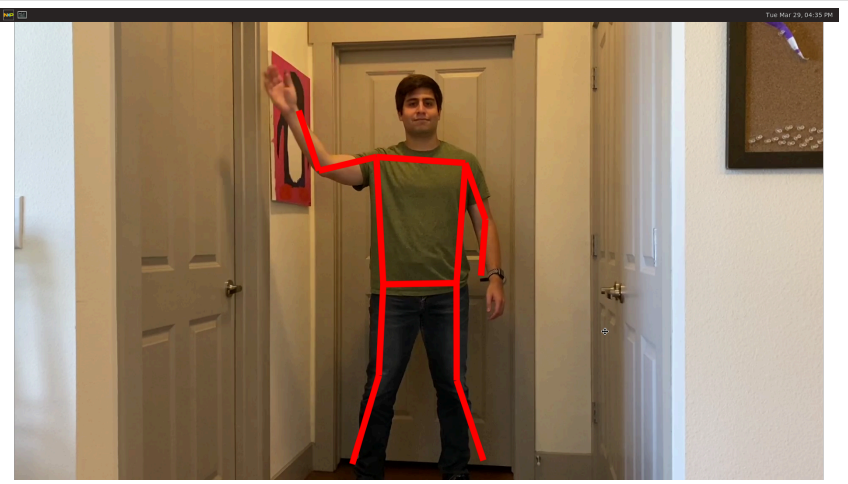
Required materials: Mouse, display, camera (if tested with camera), and Internet connection. This demo launches a GStreamer pipeline that gets a video feed from a camera or video file and runs a pose detection inference on the video frames as they come in. This demo uses a pretrained quantized PoseNet ResNet - 50 TFLite model that is trained on 17 body points. When the video starts, the detected pose is overlaid onto the incoming video feed.
3.1.4 Machine learning gateway
Required materials: Mouse, display, and camera for each device. Two devices that are connected to the same network are required. Machine Learning (ML) Gateway allows devices with limited ML processing power to use the resources of another much more powerful device to accelerate ML inferences. This application configures the i.MX 8M Plus or i.MX 93 EVKs as servers. Therefore, it allows other devices such as the i.MX 8M Mini EVK to connect and use their NPU for ML acceleration. Also, the server broadcasts its IP address for easy client connection to the ML Gateway. This application has been developed based on the i.MX 8M Plus Gateway for Machine Learning Inference Acceleration (document AN13650).
3.1.4.1 Setup
To start the ML Gateway, perform the following steps:
-
Launch GoPoint on the board that is going to be used as a server, that is, i.MX 8M Plus or i.MX 93 EVK (both have NPU).
-
Click the ML Gateway application shown in the launcher menu.
-
To start ML Gateway, select the Launch Demo button, which automatically detects the board to be configured as a server. It starts downloading the model to be used for object detection tasks.
-
Wait until it displays "Model is ready for inference!". If the model fails to download, check the Internet connection.
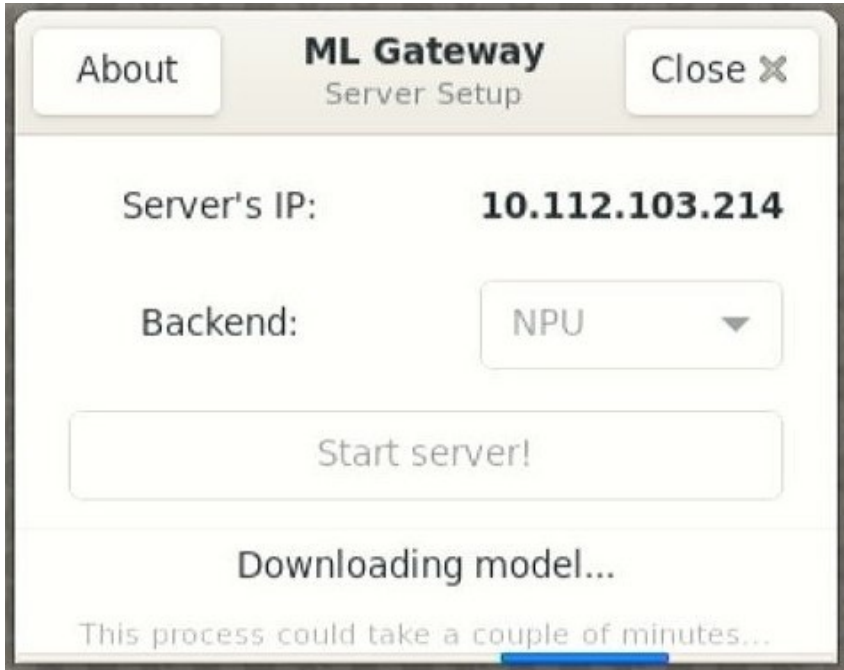
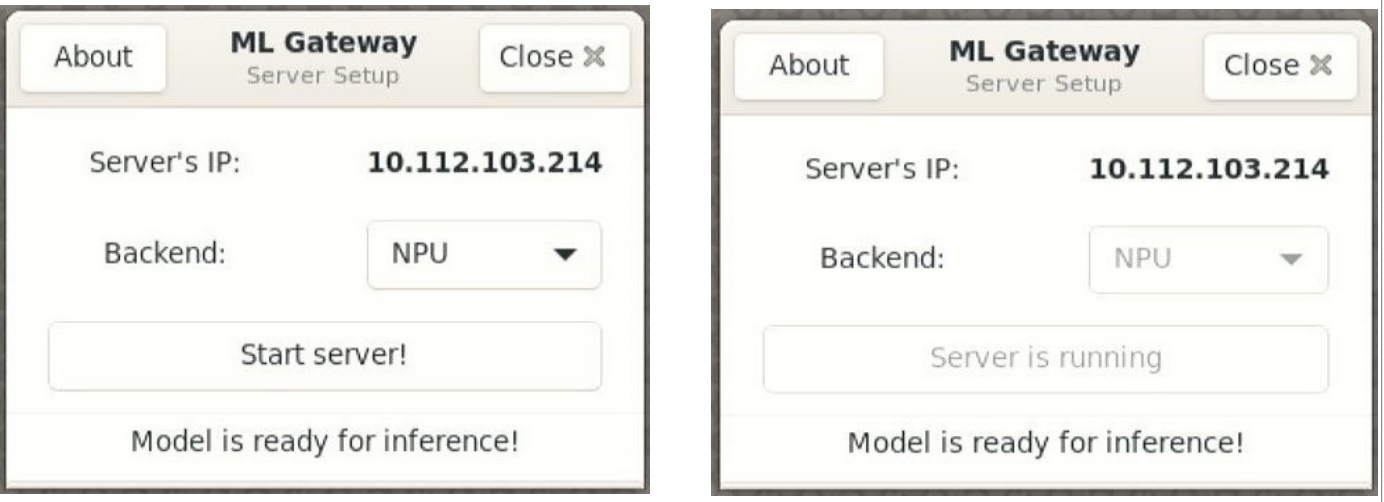
3.1.4.2 Start the server
The server board shows its current IP address in the GUI. By selecting the appropriate option from the dropdown, the server allows users to choose whether to perform inferences on the NPU or the CPU. It is expected to use the NPU. However, the user can test on the CPU to compare the inference performance when the NPU is not accelerating the ML model. When ready, click the Start Server! button. If the server is set up successfully, the "Server is running" gets displayed.
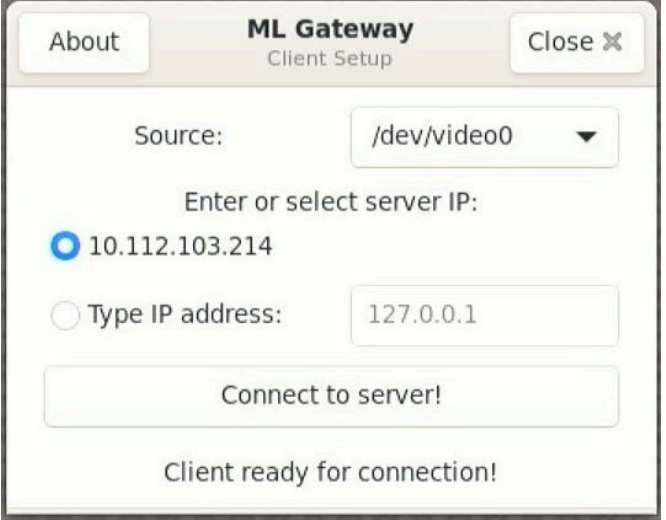
3.1.4.3 Connect client and start inference
When setting up a client, the device searches for a server IP and, if found, displays it as an option in the window. If the client is unable to detect the IP address, users can also type in their custom IP address. Ensure that the camera source is selected for the correct device. When ready, click the Connect to Server! button. The device connects to the server and displays a video output with the detected objects marked.
Note: Sometimes running the application for the first time on the client causes some latency seen in the bounding boxes being detected. It can happen only when the server is configured on the i.MX 8M Plus EVK, which needs a warming - up time to load the ML model. If this latency occurs, stop the client process and connect again to the server. It most probably fixes the latency issue and the bounding boxes must be shown in real time on the second run.
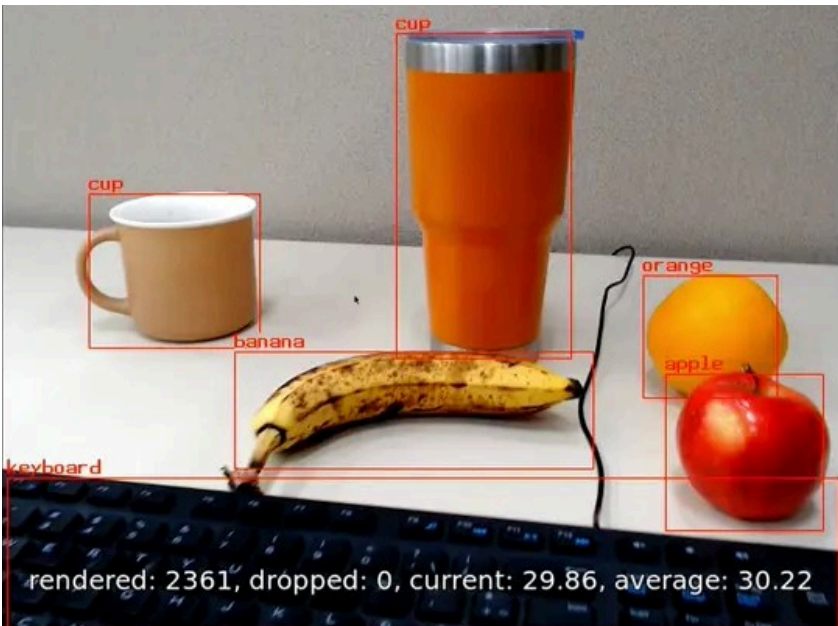
3.1.4.4 Running the application
When ML Gateway starts running on a client, a video overlay is shown with the following information:
- Class name of the detected objects and corresponding bounding boxes.
- Total rendered frames, dropped frames, current frames per second (FPS) and average FPS.
3.2 OpenCV demos
The following demo uses the OpenCV library to display video frames with inference data displayed on them.
3.2.1 Face recognition
Required materials: Mouse, display output, camera, and an Internet connection. In this demo, users can register and recognize faces in a video feed. The demo first uses a quantized TFLite SSD MobileNet V2 model to detect the faces that are in the video frame. Then, it crops the faces and uses a quantized TFLite FaceNet model to create face embeddings. These face embeddings can be used to compare with previously saved faces.

When the demo starts, a new window is displayed that allows the user to set face recognition options:
- This button can be used to quit the demo.
- These options allow certain aspects of demos to be changed: • Source: Select the camera to use. • Back - end: Select whether to use the NPU (if available) or CPU for inference.
- This button confirms the settings and starts the demo.
- This area displays the status updates while the demo is starting.

When the Run button is pressed, the demo first downloads the required model from the Internet and then warms up the NPU. The first time the demo is run, this warm - up time can take a couple of minutes. In future runs, the warm - up time is less.
When the demo is ready to begin, the following window opens:
- A camera view with inference information layered over the frame.
- A control panel.
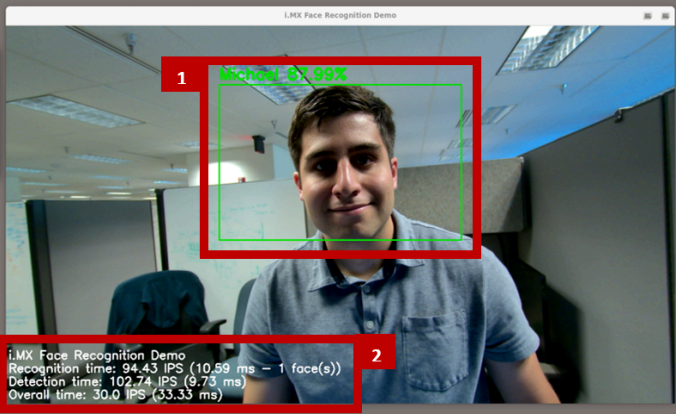
The camera view window has the following information: • Any faces that are detected are outlined with a box. A red box means that no face is saved with a similarity higher than the recognition cutoff (%) when compared to the face in the box. A green box means that a face is saved with a similarity higher than the recognition cutoff (%) when compared to the face in the box. If the detected face matches any of the registered faces, the name of this registered face is displayed above along with the percentage similarity. If there is no match, the label "Not found" is displayed instead. • The following statistics are shown: – Recognition time: It is the IPS and inference time in milliseconds required to generate a face embedding for faces in the picture. If there are multiple faces in a frame, the total time for all faces varies based on the number of faces in the frame. – Detection time: It is the IPS and inference time in milliseconds required to identify all the faces in the picture. – Overall time: It is the IPS and inference time in milliseconds required to prepare a video frame from when the application receives it.
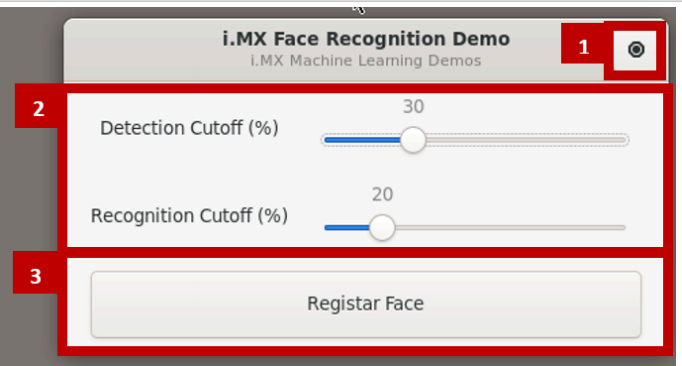
To change the behavior of the demo, the control panel has the following controls: • Detection Cutoff (%): It sets the percentage confidence required to detect a face in a video frame. Slide this option up if other objects are being detected as faces or down if faces are not being detected. • Recognition Cutoff (%): It sets the percentage similarity required to recognize a face in a video frame. Slide this option up if the demo is falsely identifying faces or down if the demo does not identify the face. • Register Face: It registers new faces to the database to be recognized. It is done locally and is removed when the application closes.
How to register a face:
- Click the Register Face button on the control panel.
- A countdown from 5 seconds starts. At the end of the countdown, the application saves the current frame and detects any faces in the frame.
- For all faces in the frame, a window prompt appears, as shown in Figure 16. Type the name of the face that appears in the blue box in the camera view. When done, click the Register Face button. If a face must not be registered, click the Skip Face button.